
Are you ready to tackle your next repair or craft project but unsure how long you need to wait for Liquid Nails to dry? Whether you’re bonding wood, metal, plastic, or painted surfaces, knowing the drying time can save you from costly mistakes and wasted effort.
You might have heard that drying times vary, but what exactly affects how long Liquid Nails takes to set on different materials? You’ll discover clear answers and practical tips to help your project stick perfectly the first time. Keep reading to find out how temperature, humidity, surface type, and product choice impact drying times—and how you can work smarter, not harder.
Drying Time Basics
Understanding the drying time of Liquid Nails is key for successful projects. Different materials affect how fast the adhesive dries. Knowing the basics helps you plan better. It ensures strong and lasting bonds for your work.
Drying Vs Curing
Drying means the surface feels dry to the touch. This usually happens within 15 to 30 minutes. Curing is the full hardening process. It can take hours to days. The glue gains full strength only after curing. Drying is quick, but curing is what really matters.
Typical Drying Times
On porous materials like wood, Liquid Nails dries faster. Expect it to be dry in 20 to 30 minutes. Non-porous surfaces such as metal or plastic take longer. They may need 1 to 2 hours or more to dry. Full curing can take up to a week, depending on conditions. Temperature, humidity, and ventilation also affect drying time.
Credit: www.ppgpaints.com
Factors Affecting Drying
The drying time of Liquid Nails varies due to several key factors. These elements influence how quickly the adhesive sets and cures on different materials. Understanding these factors helps ensure proper bonding and effective use of the product.
Each factor affects the drying process differently. Knowing them helps you plan your project better and avoid delays.
Temperature Effects
Higher temperatures speed up the drying process. The adhesive cures faster as heat helps solvents evaporate quickly. Cold temperatures slow down curing. Liquid Nails may take much longer to dry in chilly conditions.
Humidity Impact
High humidity slows drying times. Moist air prevents solvents from evaporating fast. Low humidity speeds up curing by allowing quicker solvent evaporation. Dry environments help Liquid Nails set more rapidly.
Air Circulation
Good air flow helps solvents evaporate faster. Proper ventilation speeds up drying and curing. Poor air circulation traps moisture and slows the process. Keep your workspace well-ventilated for best results.
Surface Porosity
Porous surfaces like wood absorb some adhesive, speeding drying. Non-porous surfaces like metal or plastic slow drying. The adhesive sits on the surface longer before curing fully. Surface type matters greatly for drying time.
Adhesive Thickness
Thicker layers of Liquid Nails take longer to dry. Thin layers dry quickly as solvents escape faster. Applying too much adhesive delays curing. Use only the recommended amount for quicker drying.
Drying Times By Material
Drying times of Liquid Nails vary by the material it is applied on. Each surface type affects the adhesive’s cure speed. Porosity, temperature, and ventilation also play key roles in drying time. Understanding these differences helps to plan your project better and avoid delays.
Wood Surfaces
Wood is porous and absorbs the adhesive well. Liquid Nails usually sets within 15 to 30 minutes on wood. Full curing can take up to 24 hours. Softwoods may dry faster than hardwoods due to their texture. Ensure the wood is clean and dry for best results.
Metal Surfaces
Metal is non-porous and slows drying time. Liquid Nails takes about 30 minutes to set on metal. Complete cure may require 48 hours or more. Surface preparation like sanding can improve adhesion. Make sure metal is free of oil and dust before application.
Plastic Surfaces
Plastic varies in porosity, affecting drying speed. On smooth plastics, Liquid Nails sets in 30 to 60 minutes. Some plastics may require longer cure times up to 72 hours. Avoid flexible plastics as they may not bond well. Clean plastic surfaces thoroughly before use.
Painted Surfaces
Paint creates a barrier that slows drying. Liquid Nails sets in 1 to 2 hours on painted surfaces. Full bond strength may take 48 hours or longer. Use light sanding to roughen the paint for better grip. Ensure paint is fully dry before applying adhesive.
Ceramic And Tile
Ceramic and tile are dense and non-porous materials. Drying time for Liquid Nails on these surfaces is about 1 hour to set. Complete curing can take up to 72 hours. Clean tiles with alcohol to remove grease. Avoid applying on wet or damp tiles for best adhesion.
Types Of Liquid Nails
Liquid Nails offers several types of adhesives, each suited for different materials and projects. Choosing the right type affects drying time and bonding strength. Understanding these types helps you pick the best option for your work.
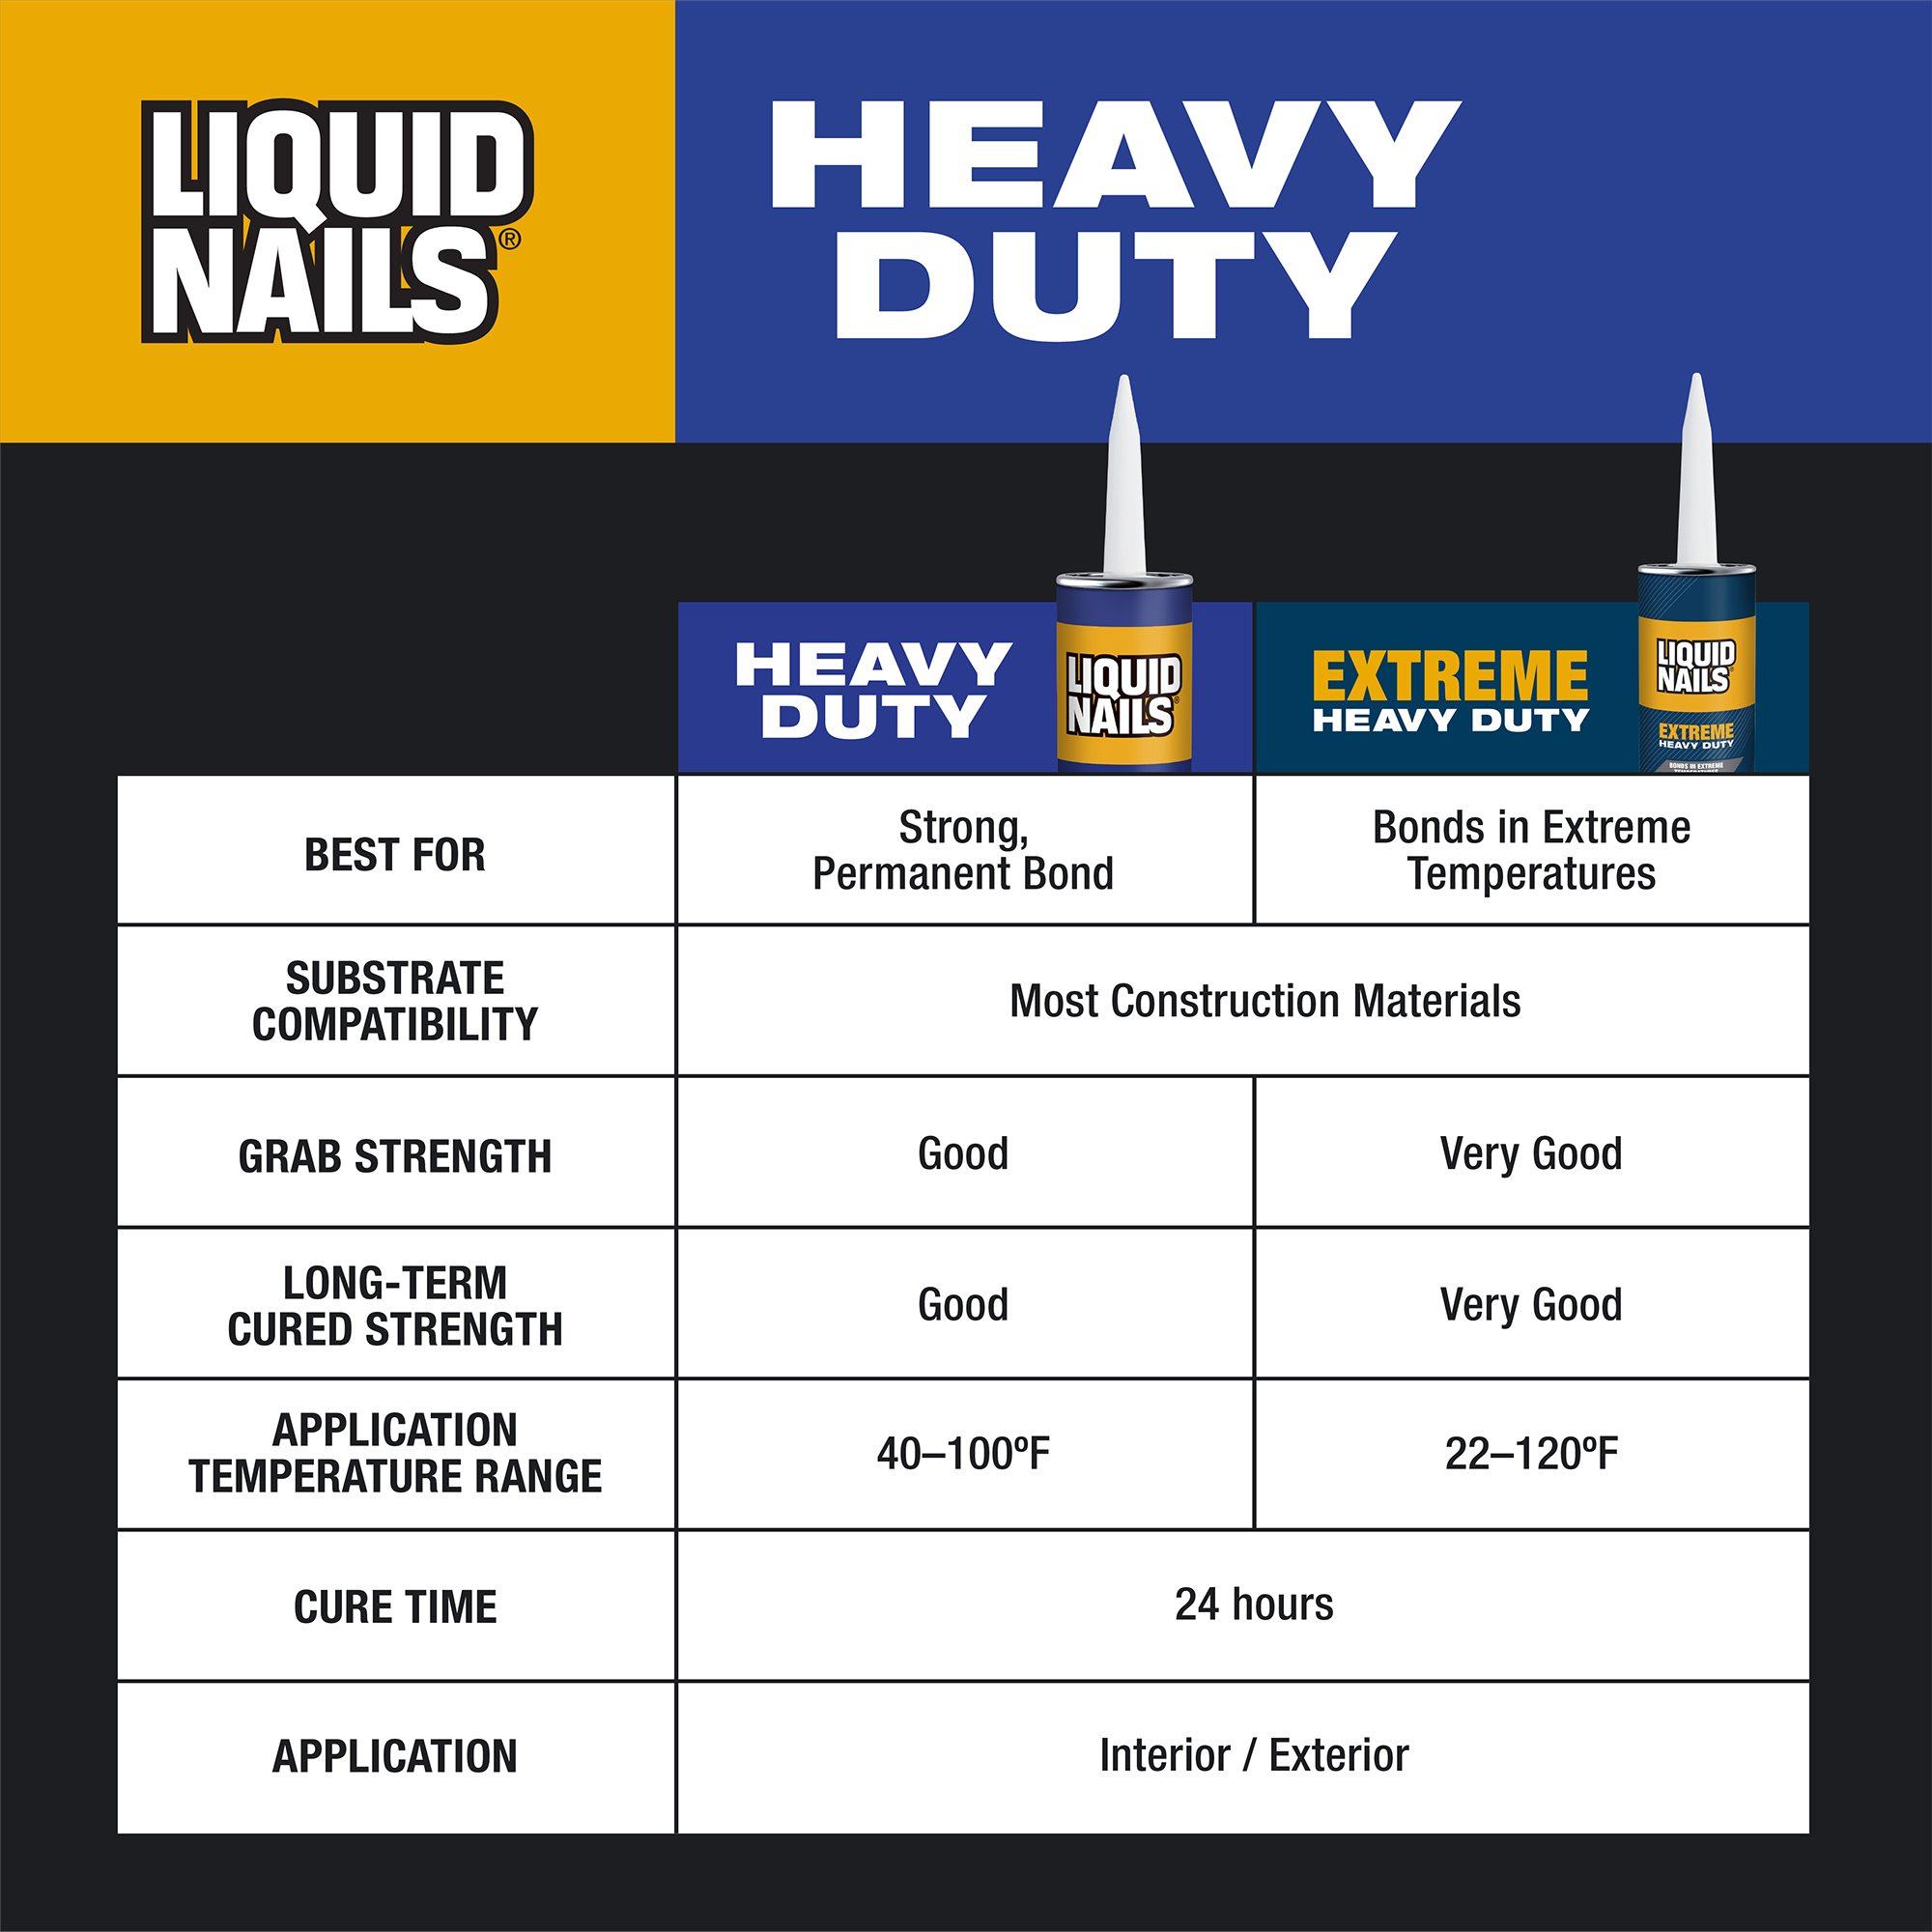
Heavy Duty
Heavy Duty Liquid Nails is strong and durable. It works well on wood, drywall, and concrete. This type usually takes 15 to 30 minutes to set. Complete drying can take up to 24 hours depending on the surface and conditions.
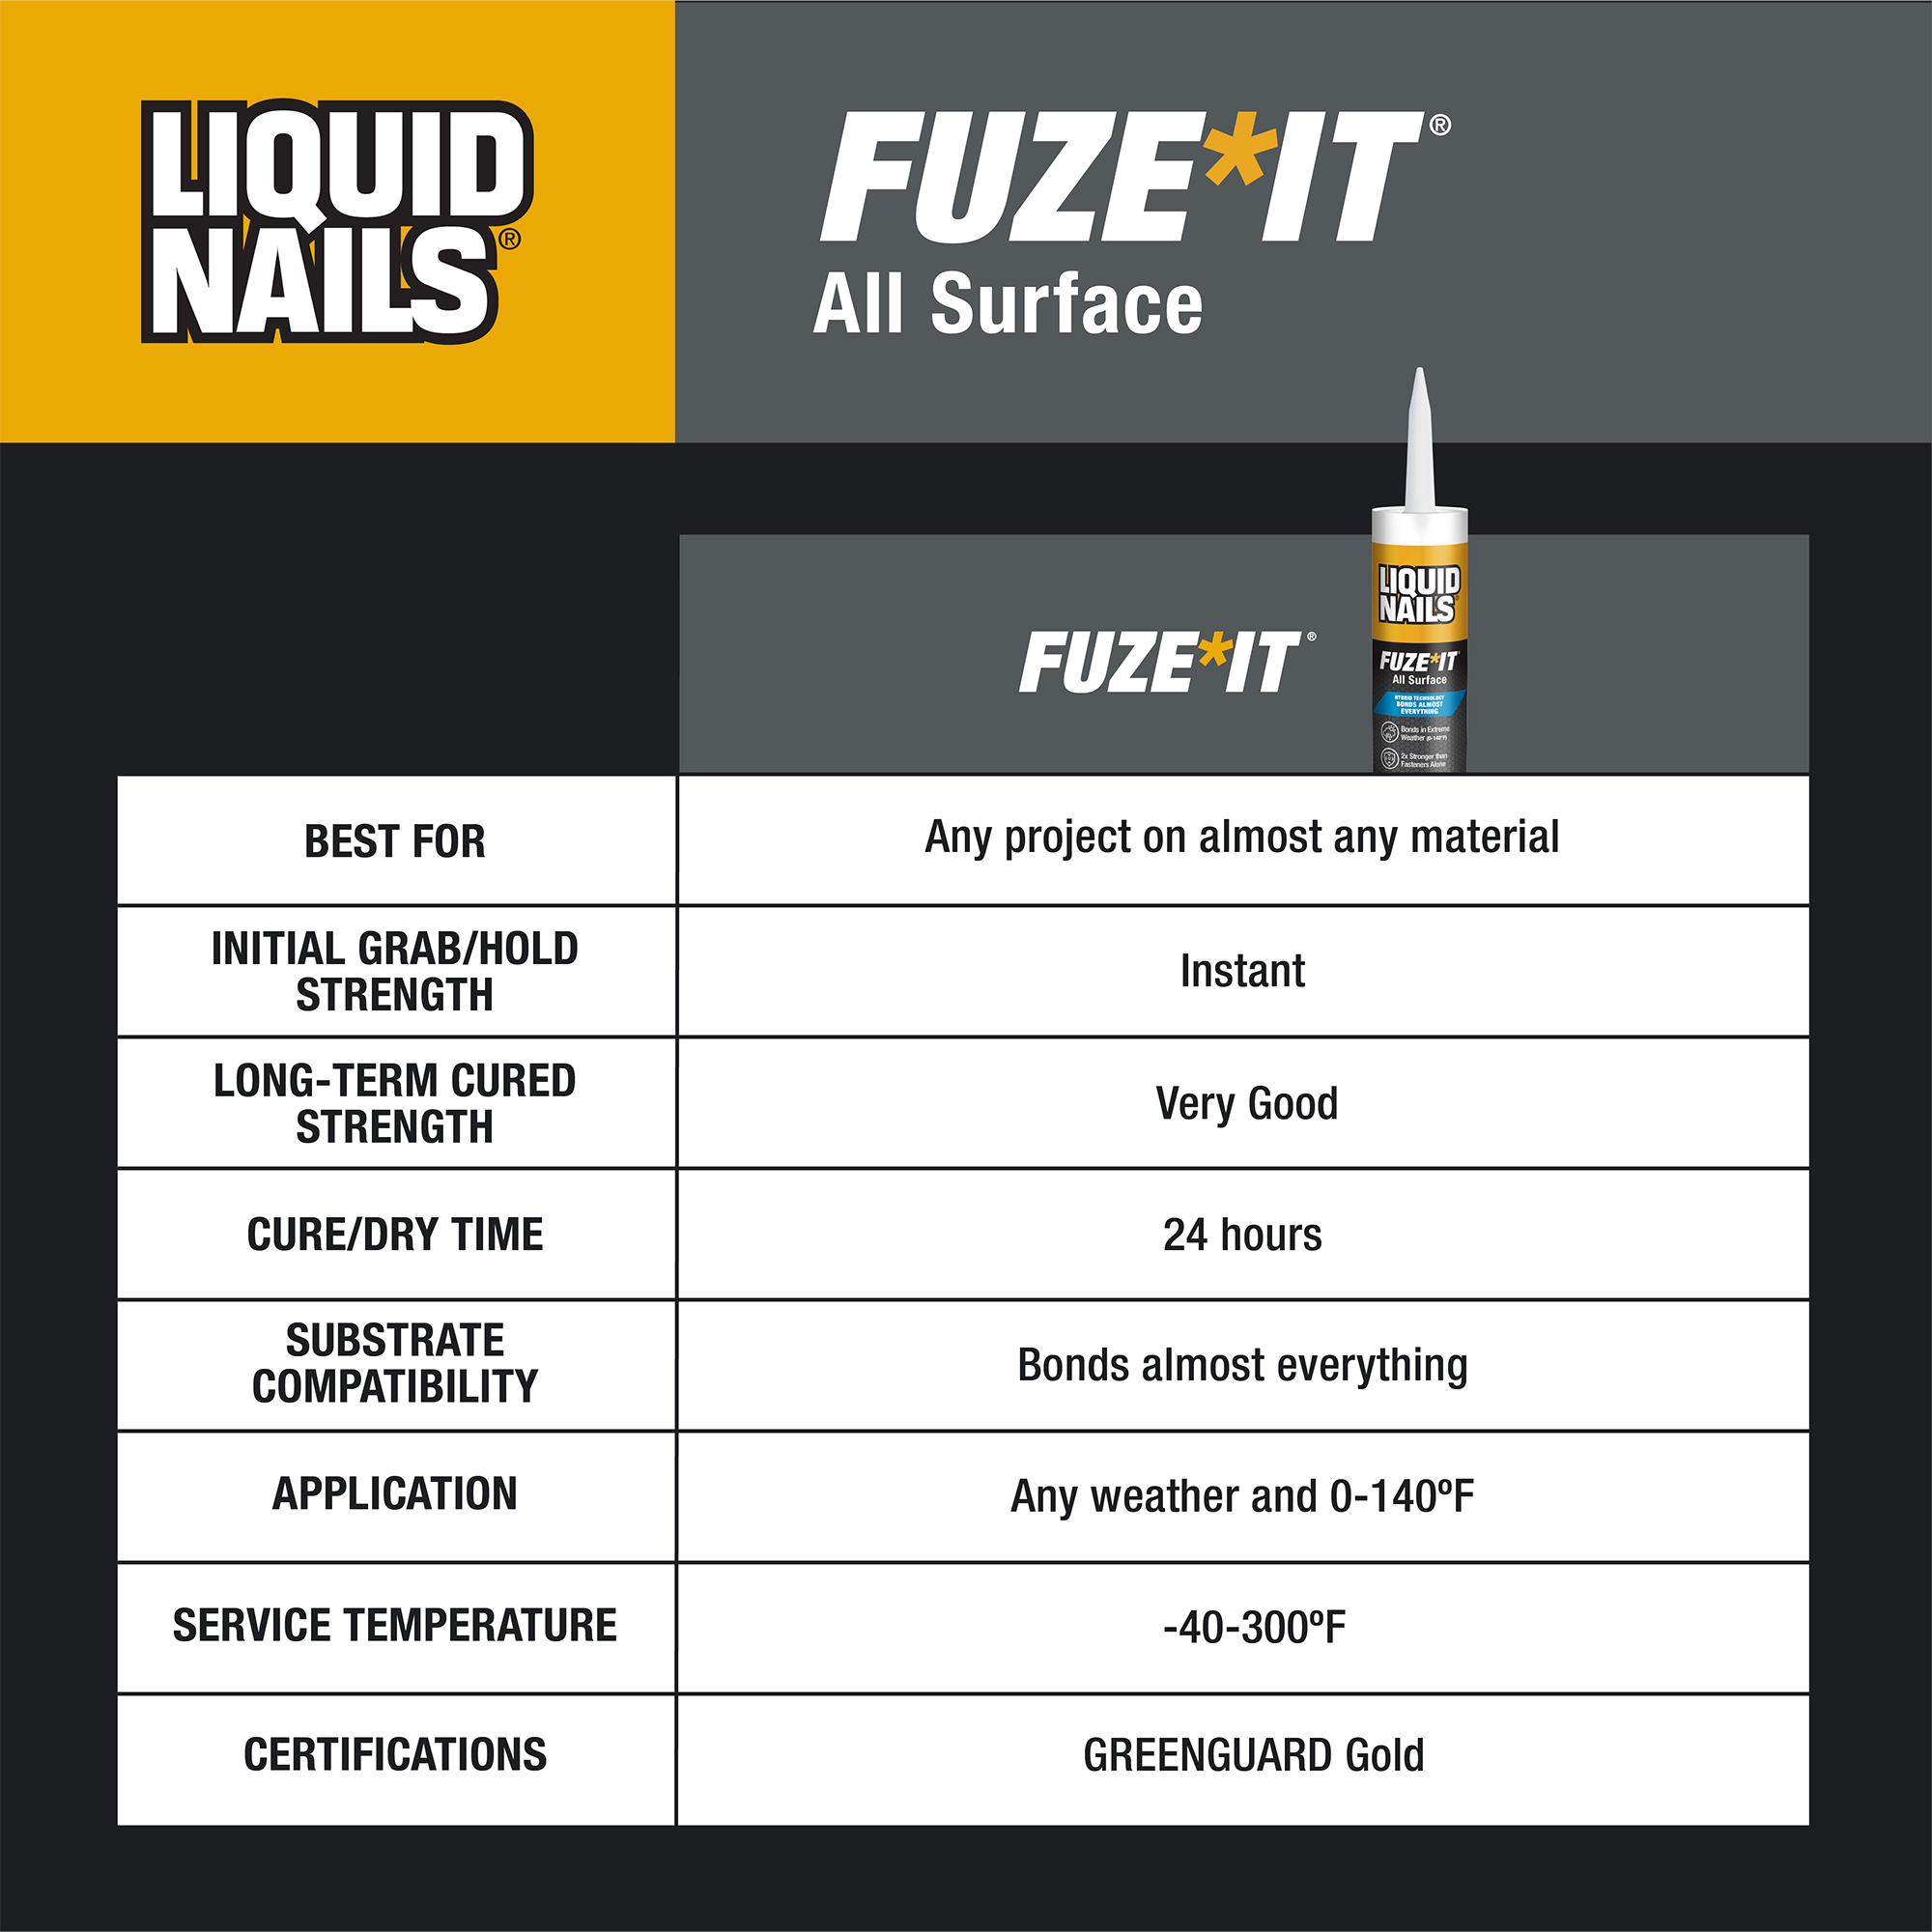
Fuzeit
FuzeIt bonds many surfaces like metal, plastic, and glass. It sets faster than Heavy Duty, often within 10 minutes. Full curing may still require 24 hours. This adhesive is flexible and resists moisture once dry.
Polyurethane-based
Polyurethane-Based Liquid Nails dries quickly on contact, often in 5 to 10 minutes. It forms a very strong bond ideal for heavy materials. However, full curing can take up to a week. This type works best on porous and non-porous surfaces alike.
Tips For Faster Drying
Speeding up the drying time of Liquid Nails can save hours during your project. Several simple steps help the adhesive cure faster and stronger. These tips improve bonding and reduce wait times on different materials.
Work In Climate-controlled Areas
Keep your workspace warm and dry. Ideal temperatures range between 65°F and 75°F. Avoid cold or damp places. Cold slows down drying and weakens the bond. A stable climate helps the adhesive set evenly and quickly.
Ensure Good Ventilation
Air circulation helps solvents evaporate faster. Open windows or use fans to move air around. Good ventilation reduces moisture and speeds curing. Avoid closed spaces where fumes can build up and slow the process.
Apply Proper Adhesive Amount
Use the right quantity of Liquid Nails. Too much glue takes longer to dry. Too little may cause weak bonds. A thin, even layer adheres faster and holds better. Follow the product instructions for best results.
Use Clamps Correctly
Clamp the materials firmly but not too tight. Pressure helps the glue spread and bond well. Keep clamps in place until the adhesive sets. Remove clamps too early, and the bond weakens. Correct clamping speeds drying and strengthens the joint.
Common Application Mistakes
Common application mistakes can delay drying times and weaken the bond of Liquid Nails. These errors often cause frustration and extra work. Understanding what to avoid helps achieve better results faster.
Applying Too Much Adhesive
Using too much adhesive slows down the drying process. Excess glue stays wet longer and creates a mess. A thin, even layer bonds better and dries quicker. Over-application can also cause the materials to shift or not fit properly.
Ignoring Surface Preparation
Dirty or wet surfaces prevent proper adhesion. Dust, oil, and moisture block the glue from sticking well. Clean and dry the surfaces before applying Liquid Nails. Light sanding can help roughen smooth surfaces for a stronger bond.
Skipping Product Instructions
Each type of Liquid Nails has specific drying times and application tips. Ignoring these can cause weak bonds or longer curing times. Always read and follow the instructions on the tube. Using the right amount and letting it cure fully is crucial for lasting results.
Clamping Guidelines
Clamping plays a key role in the drying process of Liquid Nails. It holds the materials firmly together. This pressure helps the adhesive bond better. Without clamping, the pieces might shift or not stick well. Different materials need different clamping times. Following proper clamping guidelines ensures a strong, lasting bond.
Recommended Clamping Time
For porous surfaces like wood, clamp for at least 30 minutes. This time allows the adhesive to set well. Non-porous surfaces like metal or plastic need longer clamping. Aim for 1 to 2 hours of clamping on these materials. If the weather is cold or humid, extend clamping time. Some heavy-duty Liquid Nails products may require up to 24 hours. Always check the product label for exact recommendations.
When To Remove Clamps
Remove clamps only after the adhesive has become firm. Early removal risks weakening the bond. Test by gently trying to move the materials. If they stay in place, it is safe to unclamp. For best results, wait at least 24 hours for full cure. Avoid stressing the joint during this time. Patience ensures the strongest hold from Liquid Nails.
Credit: www.ppgpaints.com
Troubleshooting Drying Issues
Drying problems with Liquid Nails can delay your project and cause frustration. Different materials and conditions affect how the adhesive cures. Knowing common issues helps you fix them fast. This section covers common drying problems and practical fixes.
Dealing With Slow Drying
Slow drying often happens in cold or humid places. Liquid Nails needs warmth and air to cure well. Poor airflow traps moisture and slows evaporation. Try moving your project to a warmer spot with good ventilation.
Non-porous materials like metal or plastic also slow drying. These surfaces do not absorb adhesive moisture. Apply thinner layers of glue to help it dry faster. Avoid sealing off the adhesive before it has time to cure.
Handling Adhesive Failures
Adhesive failure means the glue does not stick or hold. This often occurs on dirty or oily surfaces. Clean all surfaces with rubbing alcohol before applying Liquid Nails. Dust and grease block the glue from bonding properly.
Using too little or too much glue can cause failure. Too little glue does not hold strong. Too much glue stays wet and weakens the bond. Follow product instructions to apply the right amount.
Frequently Asked Questions
How Long Does It Take For Liquid Nails To Dry Completely?
Liquid Nails typically dries to the touch within 20-30 minutes. Complete curing takes 24 to 48 hours, depending on temperature, humidity, and surface type. Porous materials dry faster than non-porous ones. For best results, follow product instructions and allow full cure before stressing the bond.
What Is The Fastest Drying Liquid Nails?
The fastest drying Liquid Nails is the “Liquid Nails Fuze*It” formula. It sets in 15 minutes and fully cures within 24 hours. This adhesive works best on various surfaces and offers strong, quick bonding for fast project completion.
Can Liquid Nails Be Used On All Surfaces?
Liquid Nails works well on many surfaces like wood, metal, and plastic. Avoid using it on some plastics and non-porous materials for best results. Always check product instructions for specific surface compatibility.
How Long Should Liquid Nails Be Clamped?
Clamp Liquid Nails for at least 30 minutes to 1 hour for initial bonding. Full cure takes up to 24 hours.
How Long Does Liquid Nails Take To Dry On Wood?
Liquid Nails usually dries in 20 to 30 minutes on wood but needs 24 hours to fully cure.
Conclusion
Drying times for Liquid Nails vary by material and conditions. Wood usually dries faster than metal or plastic. Warm temperatures and good airflow speed up drying. High humidity or cold slows the process down. Always check the product label for specific times.
Give the adhesive enough time to fully cure for best strength. Patience ensures a strong, lasting bond on any surface. Keep the glued parts steady until fully dry. This helps avoid weak joints or failures later. Understanding these basics makes your projects easier and more successful.