
Have you noticed an annoying gap between your bathroom vanity and the wall? That small space might seem harmless, but it can collect dust, moisture, and even bugs, ruining the clean look of your bathroom.
You want your vanity to fit perfectly, giving your space a polished, seamless finish. The good news is, filling that gap is easier than you think. Whether the gap is tiny or a bit wider, this guide will show you simple, effective ways to close it up.
Keep reading, and you’ll learn how to make your vanity look professionally installed without calling in a pro. Let’s fix that gap once and for all!
:max_bytes(150000):strip_icc()/4-filler_strip-56a4a2725f9b58b7d0d7ee38.jpg)
Credit: talk.dallasmakerspace.org
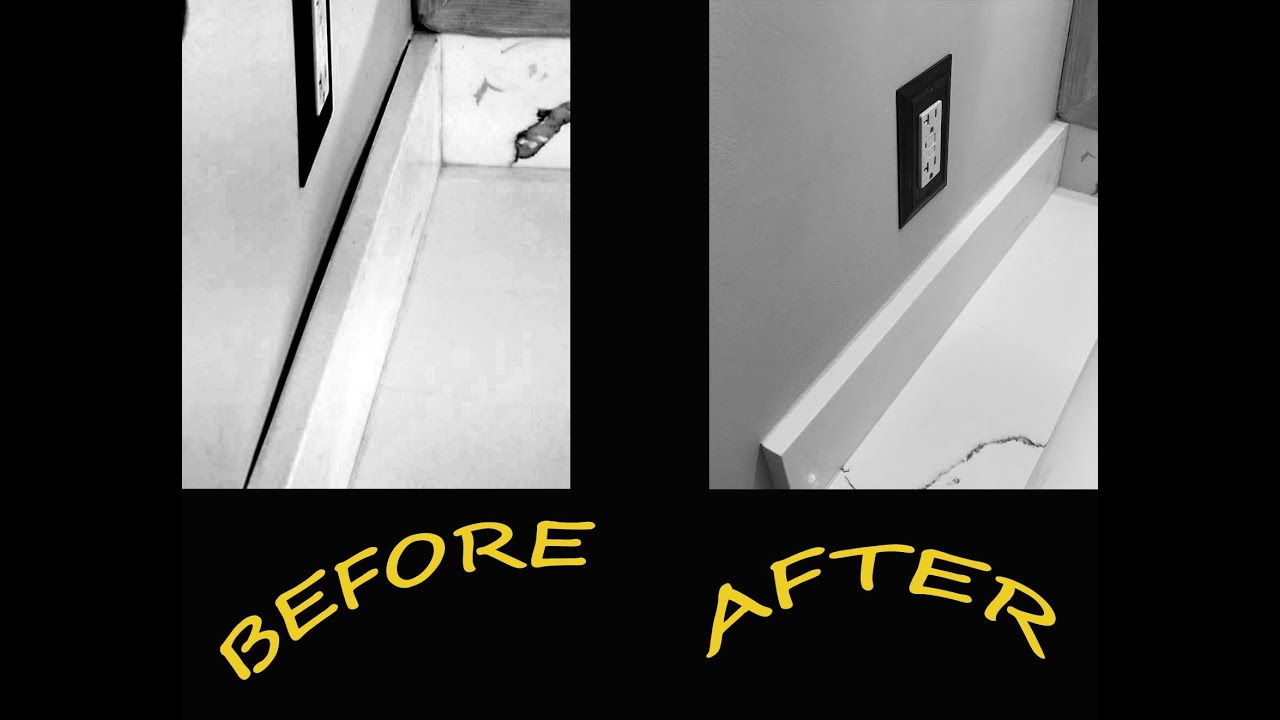
Small Gap Solutions
Small gaps between a vanity and the wall can cause dirt buildup and look unfinished. Filling these gaps improves the bathroom’s appearance and prevents moisture damage. Simple tools and materials can fix these small spaces quickly.
This section covers easy steps to handle small gap solutions effectively. Follow these steps for a neat, lasting finish.
Cleaning And Preparation
Start by cleaning the gap area thoroughly. Use an all-purpose cleaner to remove dust and grime. Let the area dry completely before moving forward. A clean surface helps the filler stick better and last longer.
Applying Painter’s Tape
Place painter’s tape along the edges of the gap. This protects the vanity and wall from excess caulk. Tape ensures clean, straight lines and a professional look. Press the tape firmly to avoid leaks under it.
Caulking Techniques
Choose paintable caulk for best results. Cut the tip of the caulk tube at a 45-degree angle. Apply a thin, even bead of caulk into the gap. Move slowly to avoid gaps or bubbles. Use enough caulk to fill the space completely.
Smoothing And Finishing
Wet your finger or a plastic putty knife to smooth the caulk line. Work gently for a clean, even finish. Remove excess caulk with a damp cloth quickly. Peel off the painter’s tape before the caulk dries to avoid tearing.
Medium To Large Gaps
Medium to large gaps between a vanity and the wall need a sturdy solution. These gaps can look unfinished and collect dust or moisture. Filling them properly improves the bathroom’s appearance and helps protect the vanity. A cabinet filler strip is the best choice for these gaps. It is easy to customize and install for a clean finish.
Measuring The Gap
Start by measuring the gap carefully. Measure at the top, middle, and bottom. Walls and floors may not be even. Note the largest measurement. This ensures the filler strip will fit properly. Use a tape measure for accuracy. Write down your numbers before cutting.
Cutting The Filler Strip
Use the measurements to cut the filler strip. Choose a strip made of wood or MDF. Cut it slightly longer than the widest part of the gap. Use a saw for a straight cut. Sand the edges smooth to avoid splinters. Paint or finish the strip to match your vanity.
Installing The Strip
Place the filler strip into the gap. Check that it fits snugly but not too tight. Adjust if needed by sanding or trimming. Push the strip fully into the space. It should sit flush with the vanity and wall. This step improves the overall look of your bathroom.
Securing And Sealing
Secure the strip with finishing nails or construction adhesive. Nails hold it firmly in place. Use a nail set to hide nail heads below the surface. Apply paintable caulk along the edges of the strip. Smooth the caulk with a wet finger for a clean line. This seals the gap and prevents moisture damage.
Uneven Wall Fixes
Uneven walls create gaps between the vanity and the wall. These gaps affect the bathroom’s look and can collect dust. Fixing these gaps makes the vanity fit neatly and improves the space’s appearance. Using a scribe strip is a common solution for uneven walls. This method shapes the filler to match wall curves perfectly.
The process involves careful measuring, tracing, and cutting. Each step ensures the filler fits snugly against the wall. Follow the steps below for a smooth, professional finish.
Measuring For Scribe Strip
Start by measuring the gap between the vanity and the wall. Take measurements at both the top and bottom. Walls are rarely straight, so note any unevenness. Record these numbers to cut the scribe strip correctly. Accurate measuring prevents gaps after installation.
Attaching The Filler
Choose a filler strip material that matches your vanity. Attach the strip to the side of the vanity using wood glue or small nails. Hold the strip firmly until the glue sets. Ensure the strip is flush with the vanity edge. This step creates a base for tracing the wall shape.
Tracing Wall Contours
Use a compass or a scribing tool to trace the wall’s uneven surface. Hold the tool against the wall and move it along the length of the filler strip. Mark the contour line clearly on the strip. This line shows where to cut for a perfect fit.
Cutting To Fit
Cut along the traced line with a jigsaw or a fine-toothed saw. Cut slowly to follow the contour precisely. Test the fit by placing the strip against the wall. Make small adjustments by sanding if needed. A well-cut strip closes the gap cleanly and looks seamless.

Credit: www.reddit.com
Additional Filling Methods
Filling the gap between your vanity and the wall improves both appearance and function. Small cracks need simple fixes, but larger spaces require stronger solutions. Additional filling methods provide effective ways to seal these gaps securely. These techniques help prevent water damage and keep pests away.
Using Expanding Foam
Expanding foam is a great option for wider gaps. It expands to fill irregular spaces fully. This foam hardens quickly, creating a solid barrier. Apply the foam carefully to avoid overflow. After it dries, trim any excess for a neat finish. Seal the surface with paint or caulk to protect the foam.
Inserting Backer Rods
Backer rods are flexible foam strips used before caulking. They fill deep or wide gaps and provide a base for caulk. Choose a backer rod slightly larger than the gap for a tight fit. Press it into the gap evenly. Then apply paintable caulk over the rod to seal the space. This method saves caulk and improves durability.
Tools And Materials
Filling the gap between a vanity and a wall requires the right tools and materials. Selecting proper items ensures a neat and durable finish. This section covers essential tools and materials to get the job done effectively.
Types Of Caulk
Caulk seals small gaps and prevents moisture damage. Acrylic latex caulk is easy to apply and paintable. Silicone caulk offers excellent water resistance but is harder to paint. Use paintable caulk for small gaps under 1/4 inch. Clear silicone works well for wood-look vanities. Choose caulk based on gap size and wall material.
Filler Strip Materials
Filler strips cover medium to large gaps between the vanity and wall. Wood strips blend well with wooden vanities. MDF strips are affordable and easy to paint. PVC strips resist water and mold in bathrooms. Measure the gap before buying strips. Cut strips slightly longer for a tight fit. Use silicone or adhesive to hold strips in place.
Cutting And Sanding Tools
Cutting tools shape filler strips to fit the gap perfectly. A handsaw or miter saw works well for wood and MDF strips. Utility knives help trim vinyl or PVC strips. Sandpaper smooths rough edges and creates a clean finish. Use fine-grit sandpaper for the best results. Proper cutting and sanding ensure a flush and professional look.
Common Mistakes To Avoid
Filling the gap between a vanity and the wall may seem simple. Yet, many make mistakes that cause poor results. Avoiding these common errors ensures a clean, lasting finish. Pay attention to the details for the best outcome.
Overfilling Gaps
Using too much caulk or filler can create a mess. Overfilling makes it hard to smooth the surface evenly. Excess material may crack or peel after drying. Apply a thin, steady bead for a neat, professional look.
Ignoring Surface Preparation
Not cleaning the gap area leads to poor adhesion. Dirt, dust, and grease prevent caulk from sticking well. Always clean the surfaces with a mild cleaner and dry completely. Proper prep helps the filler bond tightly and last longer.
Skipping Painter’s Tape
Painter’s tape protects the vanity and wall edges during filling. Skipping this step often causes smudges and uneven lines. Tape creates sharp, clean edges for the caulk or filler. Remove the tape before the material dries for the best finish.
Finishing Touches
Finishing touches make the gap between the vanity and wall look clean and complete. These final steps ensure a neat appearance and long-lasting results. Proper finishing improves your bathroom’s overall look and feel.
Sanding For Smoothness
After filling the gap, sanding is essential. Use fine-grit sandpaper to smooth the filler surface. Sand gently to avoid damaging the wall or vanity. A smooth surface helps paint or caulk adhere better. It also hides any uneven spots or rough edges.
Painting And Color Matching
Choose paint that matches the wall or vanity color. Use a small brush to apply paint carefully over the filled gap. Paint in thin layers to avoid drips or thick spots. Color matching makes the gap less noticeable. It blends the repair with the surrounding area for a seamless look.
Cleaning Up
Remove any dust or debris left from sanding. Use a damp cloth to wipe the area clean. Clean tools and brushes immediately after use. Proper cleanup prevents dirt buildup and keeps your bathroom tidy. This final step enhances the finished appearance and protects your work.
Credit: www.youtube.com
Frequently Asked Questions
How To Fill A Gap Between A Wall And A Cabinet?
Clean the gap area first. Use paintable caulk for small gaps. For larger gaps, install a cabinet filler strip or scribe a custom strip to fit uneven walls. Smooth caulk or sand the filler for a clean finish. Remove tape before caulk dries.
What Can I Do With Extra Space Between A Vanity And A Wall?
Fill small gaps between a vanity and wall with paintable caulk for a clean look. Use cabinet filler strips for medium gaps. For uneven walls, scribe filler strips ensure a perfect fit. Always clean the area and apply painter’s tape for neat edges before filling the gap.
How To Seal Gap Between Vanity And Wall Lowes?
Clean the gap area and dry it. Use painter’s tape for neat edges. Apply paintable caulk for small gaps. For larger gaps, insert a cabinet filler strip secured with screws. For uneven walls, use a scribed filler strip cut to fit the wall contour perfectly.
How To Fill A Gap Between A Counter And A Wall?
Clean the gap area thoroughly. Use paintable caulk for small gaps, or install a cabinet filler strip for larger gaps. For uneven walls, scribe a filler strip to fit the contour. Smooth caulk for a clean finish and remove excess.
Secure filler strips with screws.
How Do I Fill A Small Gap Between Vanity And Wall?
Use paintable caulk for small gaps. Clean, tape, apply caulk, smooth, and remove tape.
Conclusion
Filling the gap between your vanity and wall improves both look and function. Small gaps work well with paintable caulk for a neat finish. Medium or large spaces call for cabinet filler strips for stability and style. Uneven walls benefit most from scribed filler strips, which fit perfectly.
Always clean the area and take careful measurements before starting. This simple step helps avoid problems later. A well-filled gap keeps your bathroom tidy and stylish. Try these easy methods to complete your vanity installation with confidence.