
Is your concrete floor uneven and sloping in a way that’s causing problems? Maybe furniture wobbles, or water pools where it shouldn’t.
You’re not alone, and fixing this issue doesn’t have to be overwhelming. In this guide, you’ll discover simple, step-by-step methods to level a concrete floor that slopes, even if you’ve never tackled a project like this before. By following these practical tips, you’ll turn your uneven floor into a smooth, stable surface that feels right under your feet.
Ready to take control and transform your space? Let’s get started.
Credit: www.youtube.com
Assessing Floor Slope
Before starting to level a concrete floor that slopes, assessing the floor slope is essential. This step helps you understand how uneven the surface is. It guides the amount of material and effort needed for leveling. Proper assessment prevents future problems like water pooling or uneven flooring.
Measuring The Slope Angle
Measuring the slope angle shows how steep the floor is. Use a digital level or an inclinometer for accuracy. Place the tool on different parts of the floor to get readings. Note the steepest angle you find. This information helps decide if you need simple patching or full resurfacing.
Identifying High And Low Spots
Find high and low spots to target the uneven areas. Use a long straightedge or a laser level across the floor. Mark the places where gaps appear under the straightedge. These gaps show low spots. High spots are where the straightedge touches the floor tightly. Mapping these spots helps plan the leveling process.

Credit: eppconcrete.com
Preparing The Concrete Surface
Preparing the concrete surface is the first and most important step to level a sloped concrete floor. A well-prepared surface ensures the leveling material sticks well. It also prevents future problems like cracking or peeling. Taking time to prepare the surface properly makes the whole process easier and more effective.
Cleaning And Removing Debris
Start by removing all dirt, dust, and loose material from the floor. Use a broom or vacuum to clear away debris. Oil stains or grease spots need special cleaners. A clean floor helps the new material bond tightly with the old concrete. Skipping this step can cause the leveling layer to fail later.
Repairing Cracks And Damages
Inspect the floor for cracks, holes, or damaged areas. Fill small cracks with concrete patch or epoxy filler. Larger damaged spots may need more repair work. Smooth the repaired areas with a trowel and let them dry completely. Fixing these issues prevents weak points in the leveled floor.
Applying Bonding Agents
Apply a bonding agent to the clean, dry concrete surface. This helps the new leveling layer stick firmly to the old floor. Use a brush or roller to spread the bonding agent evenly. Follow the product instructions for drying time. Proper bonding improves durability and reduces the chance of peeling.
Choosing The Right Leveling Method
Choosing the right method to level a sloped concrete floor depends on the severity of the slope and the condition of the surface. Some methods suit small adjustments, while others handle larger uneven areas. Understanding these options helps you pick a solution that is effective, durable, and easy to apply. This section explains three common leveling methods and when to use each.
Using Self-leveling Concrete
Self-leveling concrete is ideal for floors with moderate slopes or unevenness. It flows easily and fills low spots, creating a smooth, flat surface. This method requires a clean, stable base and often a primer for better adhesion. Self-leveling concrete cures quickly and provides a strong, durable finish. It works best when you need a fast and reliable way to fix larger dips or slopes.
Applying Concrete Overlay
Concrete overlay is a thin layer of new concrete applied over the existing floor. It helps correct mild to moderate slopes and covers surface imperfections. Overlays can be customized with textures or colors for aesthetic purposes. This method needs careful surface cleaning and sometimes bonding agents to ensure proper adhesion. Overlays are good for improving both the level and appearance of a concrete floor.
Using Mortar Or Sand For Minor Adjustments
Mortar or sand is suitable for very small slopes or minor uneven spots. Mortar provides a solid patch, while sand offers a simple fill for low areas. These materials are easy to apply and inexpensive. This approach works well when the floor only needs slight correction and does not have major slope issues. It is a good choice for quick fixes before installing flooring materials.

Credit: www.youtube.com
Mixing And Applying Leveling Compound
Mixing and applying leveling compound is a vital step to fix a sloped concrete floor. This process smooths out uneven areas and creates a flat surface ready for finishing. Proper handling of the compound ensures durability and a professional look.
Following Manufacturer Instructions
Always read the product label before starting. Each brand may have different mixing ratios and drying times. Use the exact amount of water and powder as stated. Incorrect mixing can cause weak patches or cracking later. Follow recommended curing times to allow the compound to set fully.
Ensuring Proper Consistency
Mix the leveling compound until it forms a smooth, lump-free batter. The texture should be pourable but thick enough to hold shape. Too thin a mix will run off slopes and not level properly. Too thick will be hard to spread and may crack when dry. Use a drill with a mixing paddle for best results.
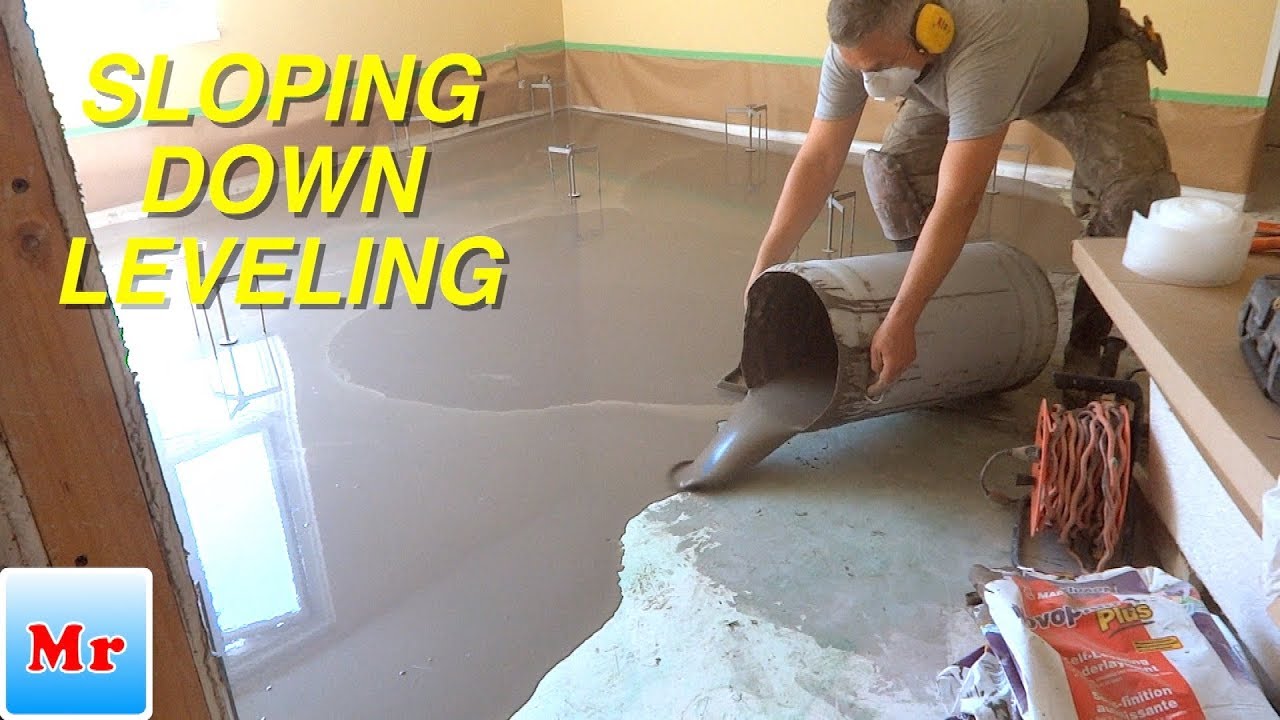
Pouring And Spreading Techniques
Start pouring at the lowest point of the floor. Let the compound flow naturally to fill low spots. Use a trowel or a gauge rake to spread the compound evenly. Work quickly to avoid drying edges. For large areas, pour in sections and blend edges to avoid seams. Smooth the surface with a long trowel for a flat finish.
Finishing And Curing
Finishing and curing are crucial steps in leveling a concrete floor that slopes. These steps ensure the surface is smooth, durable, and properly set. Proper finishing prevents cracks and uneven patches. Good curing strengthens the concrete and improves its lifespan.
Smoothing The Surface
After pouring the leveling compound, smooth the surface carefully. Use a trowel or a float to spread the material evenly. Move the tool in long, sweeping motions to avoid ridges. Remove excess compound to create a flat plane. This step helps prepare the floor for curing and final use.
Allowing Proper Curing Time
Let the concrete cure without disturbance. Keep the surface moist by covering it with plastic or damp burlap. This prevents the concrete from drying too fast and cracking. Curing usually takes 24 to 48 hours for initial set. Full strength develops over several days, so avoid heavy use until then.
Checking For Flatness
Use a level or straightedge to check the floor’s flatness after curing. Slide the tool across the surface to find any dips or bumps. Mark these areas for touch-up if needed. Ensure the floor is even to avoid problems with flooring installation or furniture placement. A flat floor improves safety and appearance.
Maintaining A Level Concrete Floor
Maintaining a level concrete floor is essential to extend its life and ensure safety. Uneven floors can cause tripping hazards and damage furniture. Keeping the floor level prevents costly repairs later. Regular care helps preserve a smooth, flat surface that supports daily activities well.
Preventing Future Slopes
Control moisture under the concrete to stop shifting. Use proper drainage around your property. Avoid heavy loads on the floor that cause cracks or sinking. Seal the concrete surface to reduce water absorption. Fix small cracks quickly to prevent them from growing. Keep the ground stable by addressing soil erosion or settling issues early.
Routine Inspection Tips
Check your floor for cracks, dips, or bumps every few months. Use a level tool or straight edge to spot uneven spots. Look for signs of water damage or mold near the floor edges. Pay attention to doors and furniture that start to wobble. Track changes over time to catch problems early. Document your findings to decide when repairs are needed.
Frequently Asked Questions
How To Make A Sloped Concrete Floor Level?
To level a sloped concrete floor, clean the surface, apply a bonding agent, then pour self-leveling concrete. Smooth and cure properly.
Can You Pour Self-leveling Concrete Over Existing Concrete?
Yes, you can pour self-leveling concrete over existing concrete. Ensure the surface is clean, sound, and primed for good adhesion.
What Is The Easiest Way To Level An Uneven Concrete Floor?
The easiest way to level an uneven concrete floor is by cleaning it, applying a bonding agent, and pouring self-leveling concrete.
Can Self-leveling Concrete Be Used On A Slope?
Self-leveling concrete can be used on gentle slopes but may not hold well on steep inclines. Proper surface preparation is essential.
How Do You Prepare A Sloped Concrete Floor For Leveling?
Clean the floor thoroughly and repair cracks before applying leveling material. A smooth base is essential.
Conclusion
Leveling a sloped concrete floor takes patience and careful steps. Start with a clean, solid surface. Use the right materials like self-leveling concrete or patching compounds. Follow instructions closely for mixing and applying. Allow proper drying time before use. A level floor improves safety and appearance.
Small efforts lead to big improvements. You can handle this project with the right guidance and tools.