
Are you noticing a slight change in the taste or smell of your refrigerator’s water and ice? It might be time to change your LG refrigerator’s air filter.
Don’t worry, it’s simpler than you think! By regularly changing your air filter, you ensure that your food stays fresh and your refrigerator operates efficiently. In this guide, you’ll discover the step-by-step process to replace the air filter in your LG refrigerator effortlessly.
Imagine enjoying cleaner air and fresher food with just a few minutes of your time. Ready to dive in and give your fridge the care it deserves? Let’s get started!
Tools Required
Changing the air filter on your LG refrigerator doesn’t require many tools. With the right equipment, you can make the process smooth and easy. Ensuring you have the necessary tools will help prevent any hiccups during the change.
Phillips Screwdriver
A Phillips screwdriver is essential for removing screws. It helps you access the filter compartment securely. Choose a medium-sized screwdriver for better grip and control.
Clean Cloth Or Towel
Use a clean cloth or towel to wipe the filter area. It removes dust and debris that may accumulate. This ensures a clean space for the new filter.
Replacement Air Filter
Have a new air filter ready. Make sure it matches your LG model. Check the manual or packaging for compatibility.
Flashlight
A flashlight can be helpful. It illuminates dark areas inside the refrigerator. This helps you see screws and the filter slot clearly.
Rubber Gloves
Wear rubber gloves to protect your hands. They provide a better grip when handling screws and filters. Gloves also keep your hands clean.
By gathering these tools, you’re set for a successful filter change. Each tool plays a crucial role in making the process efficient.
Locating The Air Filter
Find the air filter in your LG refrigerator inside the top left corner. It’s usually near the fresh air vent. Once located, you can easily change it to ensure clean, fresh air circulation.
Locating the air filter in your LG refrigerator might seem daunting at first. But it’s simpler than you think. Just imagine the satisfaction of breathing in fresh, clean air as you open the fridge door.
Finding the air filter is crucial for maintaining your refrigerator’s efficiency and your food’s freshness. Before you dive in, have you ever wondered how often you should change it? It’s typically every six months, but always check your model’s manual for specifics.
Now, let’s get started!
Inspect Your Lg Refrigerator Model
First, identify your refrigerator model. You can usually find this information on a sticker inside the fridge, either on the side wall or ceiling. Knowing the model helps you locate the air filter quickly because different models have different filter placements.
Check The Upper Section
Most LG refrigerators have the air filter located in the upper section. Open the fridge door and look toward the top. You might find a small cover or panel that houses the filter. It’s often labeled for easy identification.
Look Behind The Drawers
Some models place the filter behind the drawers. Slide out your crisper or meat drawers gently and peek behind them. You might spot the filter there, ensuring it’s out of the way of everyday storage but accessible for changes.
Consult The Manual
Still can’t find it? Your refrigerator’s manual is a treasure trove of information. It not only tells you where the air filter is but also gives clear instructions on how to remove and replace it. Manuals are often downloadable from LG’s website if you can’t find the physical copy.
Seek Online Guidance
If you’re stuck, online forums and videos can be a lifesaver. Many people share their experiences and tips, and sometimes seeing someone else do it can make it click. Plus, you might discover tricks you hadn’t thought of before.
Have you ever noticed how a small task like this can lead to a sense of accomplishment? It’s not just about the filter; it’s about taking charge of your appliances. Give it a try, and see how empowering it can be!
Removing The Old Air Filter
Changing the air filter on your LG refrigerator might seem daunting at first, but once you get the hang of it, you’ll be doing it with ease. The first step in this process is removing the old air filter. By knowing exactly how to do this, you ensure your refrigerator stays fresh and odor-free. Let’s dive into the specifics of this crucial step.
How To Locate The Air Filter
Finding the air filter is easier than you might think. Check your refrigerator’s manual for the exact location. Typically, it’s found inside the fridge compartment, near the top or back. Locate the housing cover labeled “Air Filter.”
Preparing For Removal
Before you remove the filter, make sure the fridge is turned off. You wouldn’t want to risk any electrical mishaps. Gather a soft cloth or towel to prevent any spills or mess during removal.
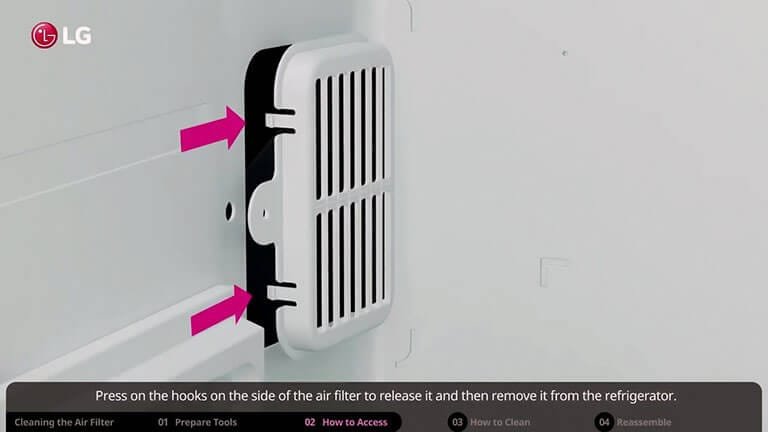
Removing The Air Filter Cover
With gentle pressure, push the tabs or buttons on the filter cover. These are designed to release the cover without any tools. Hold the cover securely, as it might fall once unlocked. Carefully place it aside.
Taking Out The Old Air Filter
Once the cover is off, you’ll see the air filter nestled inside. Grip the filter firmly and pull it out smoothly. If it’s been a while since the last change, it might require a bit more effort. Don’t worry; this is normal.
Inspecting The Old Filter
After removal, take a moment to examine the old filter. Notice any discoloration or odor? This is a sign that it was time for a change. Understanding the condition of your old filter helps you appreciate the fresh air your fridge will enjoy.
Disposing Of The Old Air Filter
Wondering what to do with the old filter? Simply discard it in your regular trash. It’s not recyclable, so tossing it away is the best option. Remember, regular changes keep your fridge performing optimally.
Removing the old air filter is a straightforward process that anyone can master. Have you ever noticed how the small tasks around the home can significantly improve daily life? By ensuring the air filter is regularly replaced, you’re contributing to a cleaner, fresher kitchen environment. What’s stopping you from making this a routine part of your home care? Take the plunge, and enjoy the freshness.
Installing The New Air Filter
Changing the air filter on an LG refrigerator is simple. First, locate the filter inside the fridge. Twist the old filter counterclockwise to remove it. Install the new filter by twisting it clockwise. Ensure it’s secure to maintain fresh air circulation.
Regular replacement keeps your refrigerator running efficiently.
Changing the air filter in your LG refrigerator is simpler than you might think. It’s a quick and easy task that can significantly improve the freshness of your fridge. After removing the old filter, the next step is installing the new one. This process doesn’t require any special tools or technical expertise, and you’ll be done in just a few minutes. Let’s dive into the steps to ensure you get it right the first time.
Step 1: Identify The Correct Filter Type
Before you start, ensure you have the right filter model for your LG refrigerator. It’s crucial to match the model number to avoid potential issues. You can find this number in your refrigerator’s manual or on the manufacturer’s website. Having the wrong filter can lead to improper installation or reduced efficiency.
Step 2: Unpack The New Filter
Take the new filter out of its packaging carefully. Inspect it for any visible damage that might have occurred during shipping. Make sure you remove any protective covers or seals that might be on the filter. These should not be installed with the filter in place.
Step 3: Insert The New Filter
Locate the filter compartment in your refrigerator. It’s typically at the back or inside the main chamber. Align the new filter with the slot and gently slide it in. You’ll usually hear a click when it’s securely in place. If it doesn’t fit easily, double-check the alignment and try again.
Step 4: Secure The Filter
Once the filter is inserted, ensure it’s locked into position. Some models require a slight twist to lock it in place. Check your manual for specific instructions. A secure filter means optimal performance and longer-lasting freshness.
Step 5: Reset The Indicator Light
Most LG refrigerators have an indicator light that alerts you when it’s time to change the filter. After installing the new one, reset this light. Typically, you do this by holding the reset button for a few seconds. If it doesn’t reset, consult your manual for troubleshooting tips.
Step 6: Test The Installation
Close the refrigerator door and listen for any unusual sounds that might suggest improper installation. Open the fridge and check if the filter is sitting correctly. If everything seems right, you’re good to go. A well-installed filter ensures your fridge runs efficiently.
Think about how this simple change can enhance the quality of the air in your fridge. Why not set a reminder for your next filter change to keep things running smoothly? Regular maintenance can prevent bigger issues down the road.
Ensuring Proper Fit
Switching your LG refrigerator’s air filter is simple and quick. Ensure a snug fit by aligning the new filter properly. This guarantees efficient airflow and keeps your fridge smelling fresh.
Changing the air filter in your LG refrigerator might seem like a minor task, but ensuring the proper fit is crucial for maintaining optimal air quality and efficiency. You might wonder why something as simple as a filter needs such attention. Well, an ill-fitting filter can lead to compromised airflow, affecting your food preservation and even energy consumption. Let’s dive into the steps to guarantee your filter fits perfectly.
Understand The Filter Type
Before diving into the installation, familiarize yourself with the filter type your LG refrigerator needs. Each model has a specific filter designed for it. Check your refrigerator’s manual or the existing filter to identify the correct type. This ensures you don’t waste time or money on the wrong filter.
Check Compatibility
Once you’ve identified the filter type, verify its compatibility with your refrigerator model. A quick search on the LG website or a call to customer service can clear up any confusion. Compatibility is crucial for a snug fit and optimal performance. Imagine the frustration of realizing the filter doesn’t fit after you’ve already removed the old one!
Inspect The Filter Housing
Before inserting the new filter, inspect the filter housing inside your refrigerator. Ensure it’s clean and free from any debris or residue that could prevent a perfect fit. A clean housing provides a smooth surface for the new filter, reducing the risk of gaps where air might escape.
Align Properly
When placing the filter, alignment is key. Ensure you are inserting the filter in the correct direction, as indicated by the arrows on the filter itself. A misaligned filter won’t fit properly and can lead to inefficiencies in air filtration. It’s a simple step that makes a big difference!
Secure The Filter
After aligning, push the filter into place until you hear or feel it click. This click indicates that the filter is securely positioned. An unsecured filter can slip, compromising its effectiveness. A quick check to confirm it’s firmly in place can save you from headaches later.
Test The Fit
Finally, test the fit by closing the refrigerator door and observing if there’s any obstruction. If the door closes smoothly without forcing, you’ve ensured a proper fit. An obstructed door can be a sign of a misaligned or improperly fitted filter. Double-checking now prevents issues later.
Changing your LG refrigerator’s air filter might seem routine, but these steps ensure you’re doing it right. Have you ever had issues with a misfitting filter? Share your experiences in the comments!
Testing The New Filter
Changing the air filter on an LG refrigerator is simple. First, locate the filter compartment inside. Then, remove the old filter and replace it with a new one. Regularly changing the filter ensures clean air circulation in your fridge. Keep your refrigerator’s air fresh and efficient with this easy maintenance step.
Testing the new air filter in your LG refrigerator is a crucial step to ensure your appliance runs efficiently. Once you’ve installed the new filter, it’s essential to verify its effectiveness. This process might seem trivial, but it can significantly impact the freshness of your food and the appliance’s overall performance. Let’s dive into the simple steps to confirm your filter is doing its job.
Check For Secure Installation
Ensure the filter is properly installed. Open the refrigerator and locate the filter compartment. Give it a gentle tug to see if it’s securely in place. A filter that’s not correctly seated can lead to inefficiencies and may not filter the air properly.
Monitor The Airflow
Stand by the refrigerator and pay attention to how the air circulates. You should feel a steady flow of air, indicating that the filter is correctly allowing air to pass through. If the airflow seems weak, you might need to recheck the installation or consider if the filter is the right model for your fridge.
Assess The Odor
Take a moment to smell the interior of your refrigerator. A new filter should reduce any unpleasant odors. If you notice lingering smells, this could indicate that the filter isn’t functioning as expected. Sometimes, odors take a while to dissipate, so give it a day or two before assessing again.
Listen For Unusual Noises
Listen closely for any strange sounds coming from your fridge. A properly functioning filter won’t make any noise. However, if you hear unusual humming or rattling, it might be time to revisit the filter installation. Such noises can be a sign that something is off.
Track The Freshness Of Food
Observe how well your food stays fresh over the next few days. Fruits and vegetables should remain crisp, and dairy products should last longer. If you notice that your produce is spoiling quicker than usual, it might be due to an issue with the air filter.
Testing the new filter isn’t just about checking off a task on your to-do list. It’s about ensuring your refrigerator performs at its best. Have you ever noticed a difference in your refrigerator’s performance after changing the filter? Share your experiences in the comments below!
How to Change Air Filter on LG Refrigerator [Here is the Maintenance Tips]
Changing the air filter in your LG refrigerator ensures clean air circulation. Locate the air filter compartment inside the fridge. Remove the old filter and replace it with a new one, aligning it properly. Regularly changing the filter enhances performance and keeps your food fresh.
Maintaining your LG refrigerator is crucial for its efficiency and longevity. A key component of this is changing the air filter regularly. Why? Because a clean air filter ensures your food stays fresh longer and your appliance runs smoothly. With a few easy maintenance tips, you can keep your refrigerator in top shape. Let’s dive into these practical steps.
Know Your Replacement Schedule
Understanding when to replace your air filter is essential. Typically, LG recommends changing the air filter every six months. However, if you notice unusual odors or reduced cooling efficiency, it might be time to replace it sooner. Mark your calendar or set a reminder on your phone. This simple step can save you from potential fridge troubles down the line.
Gather The Right Tools
Before you start, ensure you have the correct replacement filter. Check your refrigerator model number and consult your manual or LG’s website for the right part. You’ll also need a clean cloth and possibly a screwdriver. Having everything ready will make the process smoother and faster.
Follow Easy Installation Steps
Changing the air filter is straightforward. Locate the air filter compartment in your fridge, usually near the top or back panel. Remove the old filter by twisting it counterclockwise. Insert the new filter and turn it clockwise to secure it. A few minutes of your time can significantly enhance your fridge’s performance.
Keep The Fridge Clean
A clean fridge complements a new air filter. Regularly wipe down shelves and compartments with a mild cleaner. This prevents the buildup of odors and bacteria. Plus, a clean fridge is more pleasant to use. When was the last time you gave your refrigerator a thorough clean?
Monitor Your Fridge’s Performance
Observe how your refrigerator runs after changing the air filter. Are there still any unusual smells? Is the cooling consistent? These signs can indicate other issues that might need attention. Being proactive in monitoring can help you address problems before they escalate.
Save Money And Extend Appliance Life
Regular maintenance, including changing the air filter, can save you money in the long run. It reduces the likelihood of costly repairs and extends the lifespan of your appliance. Think of it as an investment in your home. Isn’t it worth the small effort for big returns?
By taking these simple maintenance steps, you ensure your LG refrigerator operates efficiently. Not only does this help keep your food fresh, but it also prolongs the life of your appliance. Regular care and attention pay off significantly. Are you ready to make your kitchen routine hassle-free?
Frequently Asked Questions
How Do I Change My Air Filter In My Lg Refrigerator?
Locate the air filter cover inside your LG refrigerator. Twist the filter cover counterclockwise to open. Remove the old filter and insert the new one. Secure the cover by twisting it clockwise. Reset the filter indicator light by pressing the “Air Filter” button for three seconds.
How Often Do You Change The Air Filter On An Lg Refrigerator?
Change the air filter on your LG refrigerator every 6 months. Regular replacement ensures optimal performance and fresh air circulation. Check the user manual for specific instructions. Keep your appliance efficient and your food fresh by maintaining a clean air filter.
How To Replace Filter In Lg Fridge?
Locate the filter in your LG fridge. Turn it counterclockwise to remove it. Insert the new filter and turn it clockwise until secure. Run water through the dispenser for about 2 minutes to clear any air or impurities.
Is It Necessary To Change The Air Filter In A Refrigerator?
Changing the air filter in a refrigerator improves air quality and eliminates odors. It ensures food stays fresh longer. Most manufacturers recommend replacing the air filter every six months. Regular maintenance helps the refrigerator operate efficiently and extends its lifespan.
Always refer to your refrigerator’s manual for specific guidelines.
How Often Should I Change The Air Filter?
Change the air filter every six months. It ensures clean air and optimal performance.
Conclusion
Changing the air filter on your LG refrigerator is simple. Follow the steps outlined, and you’ll improve your fridge’s performance. Regularly replacing the filter ensures fresh air circulation. This keeps food fresher for longer. It also helps in maintaining energy efficiency.
Always use the correct filter type for your model. Check your refrigerator manual for guidance. Set a reminder to change the filter every six months. This small task can make a big difference. Keep your kitchen running smoothly with clean air.
Enjoy the benefits of a well-maintained refrigerator.