
Is your dryer drum no longer spinning like it used to? The culprit might be a worn-out or broken dryer belt.
But don’t worry—you don’t have to call a repair technician or replace the whole machine just yet. Changing a dryer belt yourself is easier than you think, and it can save you both time and money. In this guide, you’ll get simple, step-by-step instructions to help you replace your dryer belt safely and quickly.
Keep reading to get your dryer back in action and enjoy hassle-free laundry days again!
Safety Precautions
Changing a dryer belt requires careful attention to safety. Following simple safety steps protects you from electrical shocks and gas leaks. It also prevents injuries during the repair process.
Take time to prepare before starting. Safety precautions help ensure the task goes smoothly and without accidents.
Unplug The Dryer
Always unplug the dryer from the electrical outlet first. This stops any power from flowing to the machine. It reduces the risk of electric shock while working inside the dryer.
Double-check that the plug is completely removed before opening the dryer panels.
Turn Off Gas Supply
For gas dryers, turn off the gas supply valve. This prevents dangerous gas leaks during repair. Locate the gas valve near the dryer and close it tightly.
Do not attempt belt replacement without shutting off the gas first. Safety depends on controlling the gas flow.
Wear Protective Gear
Wear gloves to protect your hands from sharp edges and dirt. Use safety glasses to shield your eyes from dust and debris.
Comfortable clothes and closed-toe shoes keep you safe and steady while working.
Protective gear reduces the chance of injury or irritation during the belt change.

Credit: hutchpaving.com
Gathering Tools And Parts
Before starting the belt replacement on your dryer, gather all tools and parts. This preparation saves time and avoids interruptions. Having the right items ensures a smooth repair process. Follow these steps to collect what you need.
Identify Dryer Model Number
Locate the model number on your dryer. This number is usually on the door frame or behind the door. It may also be on the back or side panel. Write down this number carefully. It helps find the exact belt that fits your machine.
Order Correct Replacement Belt
Use the model number to order the correct dryer belt. Check online stores or appliance shops for availability. Confirm the belt size and type match your dryer’s specifications. Using the wrong belt can damage the dryer or cause poor performance.
Prepare Necessary Tools
Gather simple tools for the job. You will typically need a screwdriver, pliers, and sometimes a socket wrench. A flashlight can help you see inside the dryer. Keep a clean cloth nearby to wipe off dust and dirt during repair.
Accessing The Dryer Drum
Accessing the dryer drum is the first step in changing the dryer belt. It requires careful removal of several parts. Each part must be handled gently to avoid damage. This section guides you through the process step-by-step.
Remove Lint Screen And Housing
Start by pulling out the lint screen from its slot. Next, unscrew the housing that holds the lint screen. This housing is usually attached with clips or screws. Removing it gives clear access to the front panel.
Release Top Panel Clips
Locate the clips holding the top panel in place. Use a flat screwdriver to gently pry them open. Lift the top panel carefully and set it aside. This step reveals the inside of the dryer drum area.
Disconnect Door Switch Wires
Find the wires connected to the door switch. Gently unplug these wires to avoid damage. Disconnecting the door switch allows you to remove the front panel fully. Take note of wire positions for easy reconnection later.
Remove Front Panel
Unscrew the fasteners securing the front panel to the dryer. Lift the panel straight up to release it from the base. Set the front panel aside carefully. Now, the dryer drum is fully accessible for belt replacement.
Credit: www.partselect.com
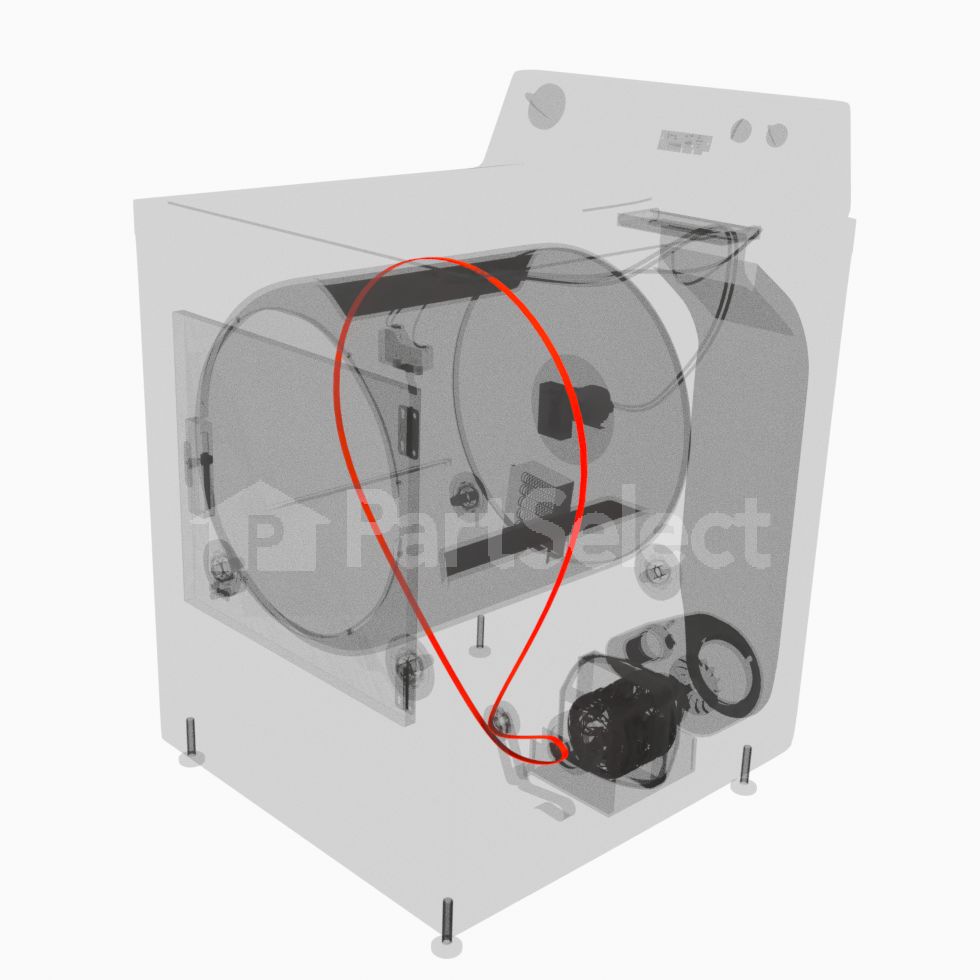
Removing The Old Belt
Removing the old belt is the first step to fixing your dryer. It helps prepare the dryer for the new belt installation. The process needs care and attention. This ensures the dryer works well after the repair. Follow these steps to remove the old belt safely and easily.
Locate Belt On Drum And Pulleys
First, open the dryer cabinet to access the drum. The belt wraps around the drum and two pulleys. One pulley is attached to the motor, and the other is the idler pulley. Look carefully to see how the belt fits around these parts. This helps you understand how to remove it.
Release Tension On Idler Pulley
The idler pulley keeps the belt tight. To remove the belt, you must release this tension. Press or pull the pulley gently to loosen the belt. This step may need some force but be careful not to break any parts. Once the belt is loose, it will be easier to take off.
Slide Off Old Belt
With the tension released, slide the belt off the drum and pulleys. Move the belt carefully to avoid damaging the drum or pulleys. Remove the belt completely from the dryer. Now, the dryer is ready for the new belt installation.
Installing The New Belt
Installing the new belt on your dryer is a crucial step in the repair process. It restores the drum’s movement, allowing your dryer to work properly again. This section guides you through placing the belt correctly and ensuring it fits well around the parts.
Position Belt On Drum
Start by placing the new belt around the drum. Make sure the ribbed side of the belt touches the drum surface. The belt should sit evenly in the drum’s center groove. Avoid twisting or overlapping the belt, as this can cause problems later.
Loop Belt Around Motor And Idler Pulleys
Next, loop the belt around the motor pulley. Then, stretch it carefully over the idler pulley. The idler pulley keeps the belt tight and prevents slipping. Hold the belt firmly to maintain tension while positioning it on these pulleys.
Check Belt Tension And Alignment
Check the belt’s tension by pressing lightly on it. It should feel firm but flexible. Ensure the belt runs straight along the drum and pulleys without leaning to one side. Misalignment can cause noise or damage during operation. Adjust the belt if needed to keep it aligned and tight.
Reassembling The Dryer
Reassembling the dryer is the final step after changing the belt. It ensures your appliance works properly and safely. Take your time to connect each part carefully. This process restores your dryer to full function.
Reconnect Door Switch Wires
Start by reconnecting the door switch wires. These wires control the dryer’s start and stop functions. Match the wire colors to their terminals. Push the connectors firmly until they click. Check the connection is secure and not loose.
Reinstall Front And Top Panels
Place the front panel back onto the dryer frame. Align it with the screw holes and clips. Next, lower the top panel into position. Make sure it fits snugly on the sides. Both panels should sit flush without gaps.
Secure All Screws And Clips
Use a screwdriver to tighten all screws holding the panels. Secure any clips that keep panels in place. Tighten screws evenly to avoid panel warping. Double-check that no screws or clips are missing. This step prevents rattling and keeps your dryer stable.
Testing The Repair
After replacing the dryer belt, testing the repair is crucial. This step ensures the dryer works safely and properly. A quick test helps catch any issues early. Follow these simple actions to confirm your repair success.
Plug Dryer Back In
First, connect the dryer to the power outlet. Make sure the plug fits securely. Do not turn on the dryer yet. This step prepares the machine for testing.
Run Short Cycle
Select a short drying cycle on the control panel. Start the dryer and watch carefully. Listen for any strange noises or vibrations. A smooth start means the belt is installed correctly.
Confirm Drum Spins Correctly
Check if the drum turns evenly and without stops. The drum should rotate smoothly and quietly. If it stalls or sounds rough, stop the dryer immediately. Fix any problems before using the dryer normally.

Credit: www.youtube.com
Frequently Asked Questions
Can I Replace A Dryer Belt Myself?
Yes, you can replace a dryer belt yourself. Unplug the dryer, remove panels, take off the old belt, install the new one, and reassemble carefully.
Is It Worth Replacing A Dryer Belt?
Replacing a dryer belt is worth it if the belt is broken or worn. It restores proper drum rotation and saves money compared to buying a new dryer. The repair is straightforward and extends the dryer’s lifespan.
How Do You Know If Your Dryer Needs A New Belt?
Your dryer needs a new belt if the drum doesn’t turn, makes squealing noises, or stops tumbling clothes properly.
How Expensive Is It To Replace A Belt On A Dryer?
Replacing a dryer belt typically costs between $50 and $150. Costs vary by model and labor fees. DIY replacement saves money.
How Do I Know If My Dryer Belt Needs Replacement?
A broken or worn belt causes the drum not to turn or makes squeaking noises.
Conclusion
Changing a dryer belt can seem tough but it is doable. Follow the steps carefully and take your time. Always unplug the dryer before starting any work. Use the right belt for your dryer model. After replacing the belt, test the dryer to ensure it runs smoothly.
Doing this repair yourself saves money and extends your dryer’s life. Small fixes like this keep your home running well. Remember, patience and safety make the job easier and safer. Now, your dryer is ready to handle laundry again.