
Is your garburator not working when you need it most? It’s frustrating when your kitchen sink suddenly turns into a pile of unwanted scraps and your disposal won’t budge.
But don’t worry—you’re not alone, and the fix might be simpler than you think. Whether your garburator is silent, humming without spinning, or completely dead, knowing the right steps to troubleshoot can save you time and money. In this guide, you’ll discover easy, practical ways to get your garburator back up and running quickly.
Keep reading, because your kitchen deserves a smooth-running disposal today!
Power Check
Power issues often cause a garburator to stop working. Checking the power supply is the first step. This helps identify simple problems before calling a technician. Follow these steps to ensure your garburator gets power correctly.
Confirm the electrical system is delivering power to the unit. Look for tripped breakers or reset buttons. These common fixes restore power and get your garburator running again quickly.
Circuit Breaker And Gfi Reset
Check your home’s circuit breaker panel for any tripped switches. A breaker may trip due to an overload or short circuit. Flip the breaker off and then back on to reset it.
Look for GFI (Ground Fault Interrupter) outlets near the kitchen sink. These outlets have a reset button, usually red or black. Press the reset button firmly to restore power to the garburator.
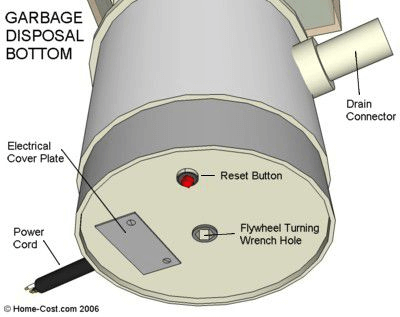
Reset Button Location And Use
The garburator has a small red reset button on its underside. This button trips if the unit overheats or jams. Press the button firmly to reset the motor.
Wait a few minutes if the unit feels hot before pressing the reset button. This prevents damage and allows the motor to cool down. After resetting, test the unit by running water and turning it on.
Credit: www.herrmannservices.com
Clearing Jams
Clearing jams in your garburator is a common fix that can restore its function quickly. Jams occur when hard objects or fibrous waste block the blades. Taking safe steps to clear the jam prevents damage and keeps your disposal working longer.
Follow simple techniques to free the blades and remove debris safely. These steps do not require professional help but do demand caution and care.
Turning Off Power Safely
Before starting any work, always turn off the power to the garburator. Locate the circuit breaker or unplug the unit. This prevents accidental starts that can cause injury.
Confirm the power is off by trying to turn on the disposal briefly. If it does not run or hum, it is safe to proceed with clearing the jam.
Using An Allen Wrench To Free Blades
Most garburators have a hex-shaped hole at the bottom center. Insert an Allen wrench into this hole. Turn the wrench back and forth to move the blades manually.
This action helps dislodge any stuck pieces blocking the blades. Keep turning until the blades spin freely and smoothly without resistance.
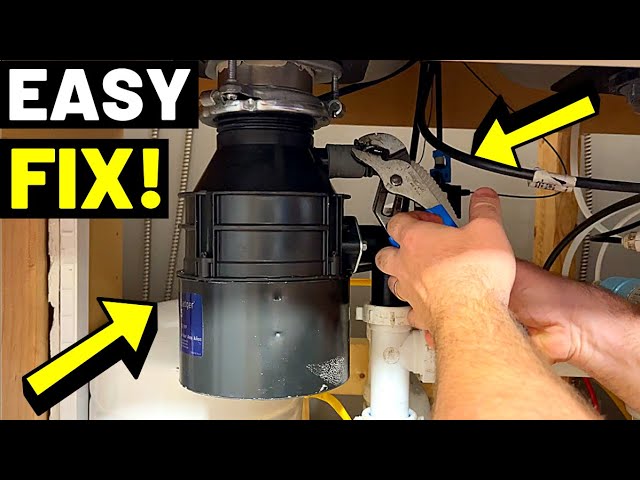
Removing Debris With Tools
After freeing the blades, use pliers or tongs to remove visible debris inside the disposal. Never use your hands to reach inside the unit.
Look for small bones, fruit pits, or dense food particles causing the jam. Clear these carefully to avoid future blockages.
Running Tests
Running tests on your garburator helps identify the root cause of the problem. These simple checks guide you through basic troubleshooting. They also prevent unnecessary repairs or replacements. Performing tests safely ensures you avoid electrical hazards or damage to the unit. Follow each step carefully and observe the garburator’s response.
Running Cold Water
Start by running cold water into the sink. Cold water helps solidify grease and food particles. This prevents clogs and protects the blades. Turn on the water before you switch on the garburator. Keep the water running while the unit operates. This flushes debris through the drain more effectively. Running water also cools the motor, extending its life.
Listening For Sounds
Listen closely when you turn on the garburator. Normal operation produces a steady grinding noise. If you hear humming without grinding, the blades might be jammed. Clicking or rattling sounds can mean foreign objects are stuck. Silence often points to power issues or a dead motor. These sound clues help you decide the next steps.
Checking For Motor Response
Check if the motor responds when powered on. Press the reset button on the bottom of the unit before testing. If the motor does not start, disconnect power first. Try manually turning the blades using an Allen wrench. This can free a jam and allow the motor to run again. If no movement occurs, the motor or wiring may need professional repair.
When Silence Means Trouble
Silence from your garburator signals a deeper problem. A working unit usually hums or whirs. No sound means the motor might have failed or electrical issues exist. Acting quickly can prevent further damage. Understanding the signs helps you decide the next step.
Signs Of Motor Burnout
A burnt-out motor often produces no noise at all. The unit won’t spin or hum when switched on. Sometimes it smells like burning plastic or rubber. The motor may feel hot to touch after trying to run it. These are clear signs the motor has overheated or failed internally.
Identifying Wiring Issues
Wiring problems can cause complete silence or intermittent operation. Loose wires or damaged insulation may stop power flow. Check the power source first, including the circuit breaker and GFI outlets. If those are fine, wiring inside the unit might be faulty. A visual inspection can spot frayed or disconnected wires.
When To Call A Professional
Do not attempt repairs beyond simple resets or inspections. Motor replacements and wiring fixes require skill and safety precautions. If the garburator stays silent after basic troubleshooting, contact a licensed technician. Professionals ensure proper diagnosis and safe repair to avoid electrical hazards.
Preventive Tips
Preventing garburator issues saves time and money. Proper care keeps it running smoothly. Follow simple tips to avoid common problems. These steps extend the life of your appliance. They reduce the chances of breakdowns and costly repairs.
Proper Usage Guidelines
Use cold water while running the garburator. It helps solidify grease and flush waste. Avoid putting hard items like bones or fruit pits inside. Do not pour grease or oil down the drain. These can clog pipes and damage the unit. Cut large food scraps into small pieces. Feed scraps slowly and steadily, not all at once. Avoid fibrous materials like corn husks or onion skins. They can tangle and jam the blades. Running the garburator empty can harm the motor. Always run water during and after use for best results.
Routine Maintenance Advice
Clean the garburator regularly to prevent buildup. Use a mixture of ice cubes and salt to scrub the blades. Citrus peels help freshen and break down residue. Avoid harsh chemicals that can damage parts. Check for leaks or loose connections under the sink. Press the reset button if the unit stops suddenly. Turn off power before inspecting or cleaning the disposal. Schedule professional check-ups if you notice strange noises or smells. Regular maintenance helps avoid complete failure and expensive fixes.
Credit: www.youtube.com
Tools For Diy Fixes
Fixing a garburator yourself saves time and money. Having the right tools makes the job easier. A few basic tools can help you identify and fix common issues quickly.
Preparing with the correct tools improves safety and efficiency. You can handle simple repairs without calling a plumber. Below are some essential items to keep handy for garburator DIY fixes.
Essential Hand Tools
A hex or Allen wrench fits many garburator models. It helps free jammed blades safely from the bottom.
A flashlight allows you to see inside the unit clearly. A pair of pliers can grab stuck debris or tighten connections.
Screwdrivers, both flathead and Phillips, assist in removing covers or panels. A bucket collects water if you need to disconnect pipes.
Safety Gear Recommendations
Always wear gloves to protect your hands from sharp parts. Safety goggles shield your eyes from splashes or flying debris.
Use ear protection if you plan to run the disposal during testing. Slip-resistant shoes help maintain a steady stance in wet areas.
Turning off power at the breaker before working prevents electric shocks. Double-check the unit is unplugged or switched off before touching it.
Credit: misterfix-it.com
Frequently Asked Questions
Why Is My Garburator Suddenly Not Working?
Check the power source, reset the red button, and clear jams using an Allen wrench. If silent or still not working, call a professional.
How Do I Reset My Garburator?
Turn off power and check circuit breaker or GFI outlet. Press the red reset button on the disposal. If jammed, use an Allen wrench to free blades. Run cold water and test. Call a professional if it still doesn’t work.
Why Is The Garbage Disposal Humming But Not Working?
A humming garbage disposal usually means it’s jammed. Turn off power, use an Allen wrench to free blades, then press reset. Check the circuit breaker and GFI outlet. If it still won’t work, the motor may be damaged and needs professional repair.
How Do I Get My Garbage Disposal Working Again?
Check the power at the circuit breaker and reset the GFI outlet. Press the red reset button on the disposal. Turn off power, remove debris with tongs, and manually rotate blades using an Allen wrench. Run cold water and test.
Call a professional if it still doesn’t work.
Why Is My Garburator Suddenly Not Working?
Check if the power is on at the circuit breaker or GFI outlet. Press the red reset button on the unit. If it hums but doesn’t spin, the blades may be jammed.
Conclusion
A garburator that stops working can cause real trouble in your kitchen. Always start by checking the power and pressing the reset button. If it hums but won’t spin, try manually turning the blades with an Allen wrench. Be safe—turn off the power before you touch anything.
Sometimes, the problem needs a professional to fix. Regular care can keep your garburator running smoothly. Don’t ignore small issues; fix them early to avoid bigger repairs. A working garburator helps keep your kitchen clean and waste-free every day.