
If you have an over-the-range microwave installed on an interior wall, you might be wondering how to properly vent it. Venting your microwave is crucial—not just for keeping your kitchen smelling fresh, but also for removing smoke, steam, and grease that can build up while cooking.
But how do you vent a microwave when there’s no exterior wall nearby? Don’t worry—you’re not alone, and there are smart solutions to this common challenge. You’ll discover simple, step-by-step methods to vent your microwave on an interior wall effectively.
By the end, you’ll know exactly how to improve your kitchen’s air quality and keep your space comfortable every time you cook. Keep reading to find out how to make your microwave venting work for you, no matter where your kitchen walls are!
Microwave Vent Types
Understanding microwave vent types helps choose the best option for your kitchen. Vents remove steam, smoke, and cooking odors. Some vents recycle air inside, while others push air outside through ducts. The choice depends on your kitchen layout and installation possibilities.
Recirculating Vents
Recirculating vents pull air through filters and send it back. These filters trap smoke and steam but not all odors or grease. They work well where exterior venting is impossible or too costly. Installation is simpler since no ductwork is needed outside. However, air quality improves less than with external vents.
External Duct Vents
External duct vents connect to ducts that lead outside. They remove steam, smoke, odors, and grease from your kitchen effectively. These vents require cutting through walls or ceilings to install ducts. They keep kitchen air cleaner by sending contaminants outside. Ideal for kitchens where duct installation is possible and preferred.
Challenges Of Interior Wall Venting
Venting a microwave on an interior wall presents unique challenges. Unlike exterior walls, interior walls lack direct access to the outside. This makes it harder to install proper ductwork and vent the air efficiently. Understanding these challenges helps plan the best solution for your kitchen setup.
Structural Limitations
Interior walls often hide plumbing, wiring, or studs. These obstacles limit where ducts can run. Cutting through these elements may cause damage or require costly repairs. The wall thickness might not be enough to fit standard ducts. Some walls are load-bearing, restricting modifications. These factors complicate vent installation and require careful planning.
Ductwork Routing Issues
Routing ductwork inside the home is tricky. The duct must travel a longer path to reach an exterior vent. Longer ducts reduce airflow and vent efficiency. Sharp bends or turns in the duct can cause blockages. Finding space for ducts between floors or ceilings is difficult. Poor routing increases noise and reduces the vent’s lifespan.
Tools And Materials Needed
Before starting to vent a microwave on an interior wall, gather all necessary tools and materials. Having everything ready ensures a smooth, safe installation. Proper tools help you work efficiently and prevent damage to your kitchen walls and microwave.
Each tool and material plays a key role in the venting process. This list covers what you will need for the job.
Basic Tools
- Measuring tape – to measure wall space and duct length.
- Drill with bits – for making holes in walls and cabinets.
- Jigsaw or drywall saw – to cut the interior wall for vent placement.
- Screwdriver set – to install mounting brackets and screws.
- Level – ensures the microwave and vents are straight.
- Stud finder – locates wall studs to avoid drilling into them.
- Utility knife – for trimming drywall or insulation.
Materials Needed
- Microwave vent kit – includes duct connectors and vents.
- Metal duct pipe – to channel air through the wall.
- Wall vent cap – covers the vent on the outside wall.
- Foil tape – seals duct joints to prevent leaks.
- Caulk or sealant – seals gaps around vent openings.
- Drywall patch kit – repairs any wall damage after vent installation.
- Screws and anchors – secure vents and microwave in place.
Safety Equipment
- Safety goggles – protect your eyes from dust and debris.
- Work gloves – protect your hands from sharp edges.
- Dust mask – prevents inhaling dust during cutting and drilling.

Credit: www.youtube.com
Planning The Vent Path
Planning the vent path is a crucial step when venting a microwave on an interior wall. This process ensures proper airflow and prevents potential damage to your home. Careful planning helps avoid obstacles and ensures the vent works efficiently. It also makes installation easier and safer.
Locating Studs And Obstructions
Start by identifying wall studs where the vent will pass through. Use a stud finder to locate these wooden supports. Avoid cutting through studs to maintain wall strength. Check for electrical wires or plumbing pipes behind the wall. Mark all obstructions clearly before making any cuts. This step reduces risks and prevents costly repairs later.
Measuring Vent Length And Diameter
Measure the distance from the microwave vent outlet to the exterior wall. This length determines the size and type of duct needed. Use a flexible tape to follow the planned vent path accurately. Check your microwave’s manual for the recommended vent diameter. Matching this size ensures proper airflow and efficient venting. Shorter and straighter vent paths improve performance and reduce noise.
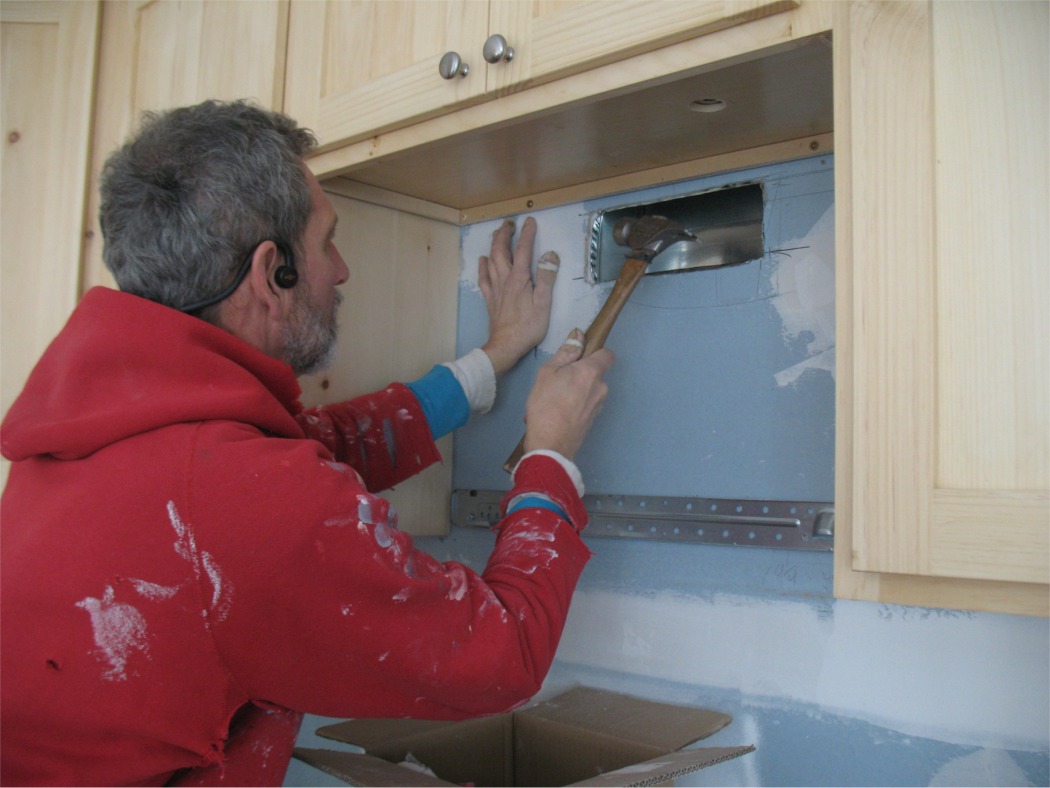
Cutting The Wall Opening
Cutting the wall opening is a crucial step in venting a microwave on an interior wall. It allows the exhaust to exit properly and prevents moisture buildup inside your home. This process requires precision and safety to avoid damage to your wall or injury to yourself. Follow these steps carefully to create a clean and effective vent hole.
Marking The Vent Hole
Start by measuring the size of the vent on your microwave. Use the template provided by the manufacturer if available. Transfer these measurements onto the wall where you plan to cut. Double-check all dimensions to ensure accuracy. Use a pencil to draw clear, straight lines outlining the vent hole. Make sure the hole aligns with the microwave vent and any existing ductwork.
Safe Cutting Techniques
Wear safety goggles and gloves before cutting the wall. Use a stud finder to avoid cutting into studs, wires, or pipes. Drill pilot holes at each corner of the marked area for easier cutting. Use a drywall saw or a rotary tool to cut along the lines carefully. Cut slowly to maintain control and prevent damage. Remove the cut piece gently and smooth rough edges with sandpaper for a clean finish.
Installing Ductwork
Installing ductwork is a key step to vent a microwave through an interior wall. Proper duct installation ensures that smoke, steam, and odors leave your kitchen efficiently. It also protects your home from moisture buildup and potential damage.
Planning the ductwork layout carefully helps avoid sharp bends and long runs. Smooth airflow reduces noise and improves venting performance. Using the right materials and sealing all connections tightly prevents leaks and energy loss.
Choosing The Right Duct Material
Select duct material that is durable and easy to clean. Metal ducts, such as aluminum or galvanized steel, resist heat and corrosion better than plastic. Rigid metal ducts offer smooth interiors for better airflow. Avoid flexible plastic ducts as they can trap grease and reduce airflow.
Use duct sizes recommended by the microwave manufacturer. A duct that is too small causes poor venting and noise. Larger ducts reduce airflow resistance and increase efficiency. Make sure the duct runs straight and short for best results.
Sealing Joints And Connections
Seal all duct joints with metal foil tape designed for HVAC use. Do not use standard duct tape because it fails quickly. Tight seals prevent air leaks that reduce venting power.
Apply mastic sealant over joints for extra protection against leaks. Check all connections around the microwave vent hood and exterior wall cap. Proper sealing helps maintain air pressure and keeps your home energy efficient.
Inspect ductwork regularly for loose joints or damage. Re-seal any problem areas to keep your microwave vent working well over time.
Connecting Microwave To Vent
Connecting your microwave to the vent is a key step for proper air flow. It allows smoke, steam, and odors to exit your kitchen. This setup helps keep your kitchen fresh and clean. The process involves attaching the vent collar and securing the microwave firmly to the wall.
Attaching The Vent Collar
Start by locating the vent collar on the microwave’s exhaust outlet. Fit the collar securely to the vent opening. Use metal screws to fasten it tightly. Make sure the collar aligns with the vent pipe on the interior wall. This connection prevents air leaks and directs airflow correctly. Check that the collar fits flush against the microwave and wall surface.
Securing The Microwave
Once the vent collar is attached, position the microwave in place. Lift it carefully and align it with the mounting bracket on the wall. Use the provided screws to secure the microwave firmly. Tighten all screws to ensure the unit does not move. Double-check the vent connection after securing the microwave. This step prevents vibrations and keeps the vent stable during use.

Credit: diy.stackexchange.com
Testing And Maintenance
Proper testing and maintenance keep your microwave vent working well. Regular checks help spot problems early. Good airflow and clean parts extend the vent’s life. Simple tasks prevent major repairs and improve kitchen air quality.
Checking Airflow Efficiency
Test airflow by turning the microwave vent on. Place a piece of tissue near the vent. The tissue should move if airflow is strong. Weak or no movement means blockage or a fan issue. Check the duct for bends or debris. Clear any obstacles to restore airflow.
Cleaning Filters And Ducts
Remove and clean the vent filters every month. Soak filters in warm, soapy water. Rinse and dry before reinstalling. Clean the ducts at least twice a year. Use a vacuum or brush to remove dust and grease. Clean ducts improve air movement and reduce fire risk.
Safety And Code Compliance
Ensuring safety and meeting code requirements is essential when venting a microwave on an interior wall. Proper installation protects your home from hazards and keeps your kitchen air clean. Understanding regulations and fire risks helps prevent costly mistakes and unsafe conditions.
Local Building Codes
Check local building codes before starting any venting work. Codes vary by city and state, especially for kitchen ventilation. These rules cover duct size, materials, and vent placement.
Many areas require vent ducts to lead outside the house. Some allow recirculating vents if outside venting is impossible. Always get permits and inspections if needed.
Fire Safety Considerations
Use fire-resistant materials for the vent duct and wall openings. Avoid plastic ducts that can melt or catch fire. Metal ducts are safer and often required by code.
Seal all duct joints tightly to stop heat and smoke leaks. Keep ducts short and straight to reduce fire risks and improve airflow. Clean ducts regularly to prevent grease build-up, which can ignite.
Alternative Venting Solutions
Venting a microwave on an interior wall can be tricky. Traditional venting through an exterior wall is not always possible. Alternative venting solutions help manage steam, smoke, and odors effectively. These options can fit various kitchen layouts and budgets.
Using Recirculating Filters
Recirculating filters pull air from the microwave and clean it. The air passes through charcoal or grease filters first. Then, the filtered air returns to the kitchen. This method does not require ductwork or exterior venting.
These filters catch smoke and steam but have limits. They do not fully remove odors or grease. This solution suits kitchens where venting outside is impossible. The filters need regular cleaning or replacement to work well. It is a simple and cost-effective option.
Installing A Range Hood Instead
A range hood can replace a microwave vent. It usually hangs above the stove and connects to ductwork. The hood vents air outside or recirculates it using filters. Range hoods come in many sizes and styles to match your kitchen.
This option often offers stronger ventilation than microwave vents. It removes more smoke, grease, and odors from cooking. Installing a range hood may require professional help. It is a good choice for serious cooks and larger kitchens.
Credit: www.finehomebuilding.com
Frequently Asked Questions
Does A Microwave Hood Have To Vent Outside?
A microwave hood does not always have to vent outside. Some models recirculate filtered air back indoors. Outside venting better removes smoke, grease, and odors. Choose venting based on your kitchen setup and model type.
Can You Vent A Microwave Inside?
You can vent a microwave inside using a recirculating model that filters air and returns it to the kitchen.
How To Vent A Built-in Microwave?
To vent a built-in microwave, connect its exhaust to ductwork leading outside. Use proper vent kits and seal all joints tightly. Choose between recirculating filters or external vents for effective smoke and odor removal. Ensure vent placement follows manufacturer guidelines for optimal airflow and safety.
What Are The Options For Microwave Venting?
Microwave venting options include recirculating vents that filter and recycle air, and external vents that expel air outside. External venting removes smoke, odors, and grease more effectively. Recirculating vents suit kitchens without ductwork access but are less efficient. Choose based on installation feasibility and ventilation needs.
How Do You Vent A Microwave On An Interior Wall?
Use ductwork to route the microwave vent through the wall to the outside. Seal all connections well.
Conclusion
Venting a microwave on an interior wall takes careful planning and the right tools. Proper ductwork ensures steam and odors leave your kitchen efficiently. Always measure twice and cut once for the best fit. Choose venting options that suit your home’s layout and needs.
A well-vented microwave improves air quality and cooking comfort. Keep safety and local codes in mind during installation. With patience and care, your kitchen will stay fresh and smoke-free. Simple steps lead to effective results every time.