
Ready to transform your rough, dull concrete into a smooth, polished surface? Whether you’re fixing a patio, countertop, or floor, sanding concrete is the key step that makes all the difference.
But if you’ve never tackled this before, the idea might feel overwhelming. Don’t worry—you’re about to learn simple, proven techniques to get the job done right. From picking the right tools to mastering the sanding process, this guide will help you avoid common mistakes and achieve a flawless finish.
Keep reading, and you’ll soon have concrete that looks and feels professionally finished.
Credit: planhub.com
Tools And Materials
Preparing to sand concrete requires having the right tools and materials. Each item plays a key role in making the process smooth and effective. Using proper equipment helps achieve a clean, even surface without damaging the concrete. Below are the main tools you need to get started.
Diamond Sanding Pads
Diamond sanding pads are designed specifically for concrete. They contain tiny diamond particles that grind down the hard surface. These pads come in different grits, from coarse to fine. Start with coarse pads to remove rough spots or old coatings. Then, switch to finer pads to smooth the surface.
Regular sandpaper will wear out quickly on concrete. Diamond pads last longer and provide better results. They fit on hand sanders or machines like angle grinders. Using the right grit in steps helps avoid deep scratches on the concrete.
Angle Grinders And Sanders
Angle grinders and concrete sanders power the sanding pads. Angle grinders are versatile and strong. They work well for large areas or tough spots. Sanders are easier to handle for flat surfaces and edges. Both tools allow you to attach diamond pads or discs.
Choose a tool that fits your project size and skill level. A variable speed grinder or sander offers better control. This control helps prevent over-sanding or uneven patches. Make sure the tool’s size matches the pad you plan to use.
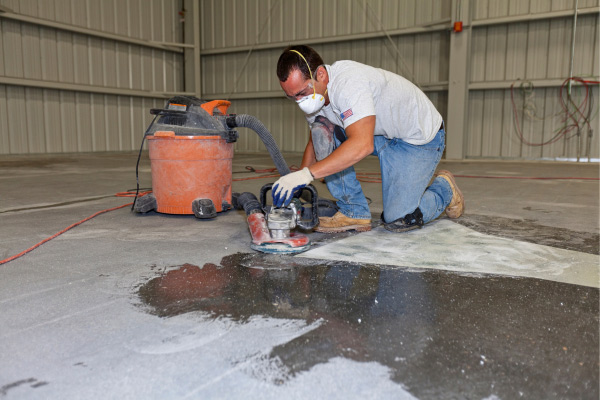
Safety Gear
Sanding concrete creates dust and debris. Protect your eyes with safety goggles. Wear a dust mask or respirator to avoid breathing harmful particles. Gloves shield your hands from rough surfaces and tool vibrations.
Use ear protection to reduce noise from power tools. Long sleeves and pants keep your skin safe. Proper safety gear helps prevent injuries and health issues. Never skip this step when sanding concrete.
Preparing Concrete Surface
Preparing the concrete surface is the first step before sanding. A clean and smooth base helps achieve better results. Proper preparation removes dirt, debris, and imperfections. This process makes sanding easier and more effective.
Follow these key steps to prepare your concrete for sanding. Each step ensures the surface is ready for a smooth finish.
Cleaning The Area
Start by clearing the area of dust, dirt, and debris. Use a broom or vacuum to remove loose particles. Wash the surface with water and mild detergent. Scrub stubborn stains with a brush. Allow the concrete to dry completely before sanding.
Repairing Cracks And Holes
Inspect the concrete for cracks and holes. Fill small cracks with concrete patch or filler. For larger holes, use a concrete mix. Smooth the repair with a trowel. Let the repairs dry and cure fully to avoid sanding issues later.
Removing Old Coatings
Check for paint, sealers, or adhesives on the concrete. These coatings can clog sanding tools and affect the finish. Use a chemical stripper or grinder to remove old layers. Clean the surface again to remove residue. A bare concrete surface is ready for sanding.
Choosing The Right Grit
Choosing the right grit is crucial when sanding concrete. It affects how smooth and even the surface becomes. Using the correct grit helps remove imperfections without damaging the concrete. The process involves starting with a rough grit and moving to finer ones. This gradual change ensures a clean, polished finish.
Starting With Coarse Grit
Begin with a coarse grit, usually between 40 and 60 grit. It removes large bumps, old paint, and rough areas quickly. This grit exposes the aggregate beneath the surface if needed. Use diamond sanding pads or discs for best results. Coarse grit shapes the concrete and prepares it for finer sanding.
Transitioning To Medium Grit
Next, switch to a medium grit, like 80 or 100 grit. This smooths out the scratches left by the coarse grit. The medium grit refines the surface and evens out rough patches. It also helps remove dust and small debris from the concrete. This step readies the surface for the final sanding phase.
Finishing With Fine Grit
Finish with a fine grit, usually 120 to 220 grit. This grit polishes the concrete and creates a smooth, clean surface. Fine grit removes any remaining marks and scratches. It enhances the overall look and feel of the concrete. Use this grit carefully to avoid over-sanding or creating uneven spots.

Credit: www.wikihow.com
Sanding Techniques
Sanding concrete requires precise techniques to achieve a smooth, even surface. Using the right methods improves results and protects the concrete. Proper sanding reduces dust and prevents damage to tools. Below are key sanding techniques to follow for best results.
Dry Vs Wet Sanding
Dry sanding uses no water and creates a lot of dust. It is faster but dust can be harmful to breathe. Use a vacuum or mask for safety. Wet sanding uses water to reduce dust and cool the surface. It helps prevent the concrete from overheating. Wet sanding often gives a smoother finish but needs cleanup afterward.
Even Pressure And Movement
Apply steady, even pressure on the sander or sanding block. Pressing too hard can cause uneven surfaces or damage. Move the sander in slow, circular or back-and-forth motions. Keep the sander flat against the concrete at all times. Avoid staying in one spot too long to prevent gouges.
Cleaning Between Grits
Remove all dust and debris after each grit change. Use a brush or vacuum to clean the surface thoroughly. Dirt left on the concrete can scratch it during the next sanding step. Cleaning ensures each grit works properly. It helps achieve a smooth, polished finish.
Handling Rough Concrete
Rough concrete surfaces need special care to achieve a smooth finish. Handling these uneven areas properly ensures a polished and durable result. It involves a mix of grinding, filling, and light sanding. Each method tackles different levels of roughness on the concrete.
Grinding High Spots
High spots on concrete can create an uneven floor or surface. Use a concrete grinder with diamond blades for best results. Move the grinder slowly over the raised areas. This removes excess material and levels the surface. Always wear safety gear to protect from dust and debris. Grinding also opens the concrete’s pores for better adhesion if sealing is planned.
Using Self-leveling Compounds
Deep rough patches may need more than grinding. Self-leveling compounds fill low areas and create a flat surface. Mix the compound according to instructions for the best texture. Pour it over the rough spots and spread evenly with a trowel. Allow it to cure fully before sanding or finishing. This method improves both appearance and strength of the concrete.
Sanding For Minor Roughness
For small imperfections and light roughness, sanding is the best option. Use diamond sanding pads starting with coarse grit, then finer ones. Sand in circular motions to smooth out scratches and bumps. Regular sandpaper won’t work well on concrete. Keep the surface damp to reduce dust and heat. Sanding prepares the concrete for sealing or painting later.
Finishing Touches
After sanding concrete, finishing touches make a big difference. They protect the surface and bring out its smooth texture. Proper care ensures the concrete lasts long and looks great. Follow these simple steps to complete your sanding project perfectly.
Cleaning The Surface
Remove all dust and debris from sanding. Use a broom or vacuum to clear the area. Wipe the surface with a damp cloth to pick up fine particles. Let the concrete dry fully before the next step. A clean surface helps sealers stick better.
Sealing Concrete
Apply a concrete sealer to protect the smooth finish. Choose a sealer made for your specific concrete type. Spread the sealer evenly using a brush or roller. Avoid puddles and bubbles for a smooth look. Let the sealer dry as per the product instructions.
Maintaining Smooth Finish
Keep the concrete clean by sweeping regularly. Wash spills quickly to prevent stains. Use mild cleaners that do not harm the sealer. Reapply sealer every few years to maintain protection. Proper care keeps your concrete smooth and attractive for years.
Common Mistakes To Avoid
Sanding concrete can be a rewarding project. Avoiding common mistakes saves time and effort. Many beginners make errors that affect the final result. Understanding these pitfalls helps achieve a smooth, even finish. Here are some frequent mistakes to watch out for.
Using Incorrect Abrasives
Concrete requires special abrasives. Regular sandpaper wears out fast and clogs easily. Diamond sanding pads or discs work best. They last longer and cut through concrete effectively. Using the wrong abrasive damages the surface and wastes materials. Always choose abrasives made for concrete sanding.
Skipping Grit Progression
Jumping straight to fine grit is a common error. Start with coarse grit to remove rough patches and old coatings. Then move to medium grit to smooth scratches made by coarse pads. Finish with fine grit for a polished surface. Skipping grits leaves uneven areas and visible scratches. Follow the grit progression for best results.
Neglecting Safety Measures
Sanding concrete produces dust and debris. This dust can harm your lungs and eyes. Always wear a mask and safety goggles. Use ear protection if you operate power tools. Work in a well-ventilated area or use a dust extraction system. Ignoring safety puts your health at risk and slows your work.

Credit: www.bigrentz.com
Diy Tips And Tricks
Working on concrete sanding yourself saves money and gives control over the finish. Some simple tips make the job easier and improve results. These tricks help manage dust, keep the surface smooth, and avoid common mistakes. Follow these easy steps for a better DIY concrete sanding experience.
Using Spray Bottles For Wet Sanding
Wet sanding reduces dust and cools the surface. Spray bottles provide a steady mist of water while sanding. Lightly wet the concrete before and during sanding to keep dust down. Avoid soaking the surface to prevent damage. Wet sanding also helps the abrasive last longer and gives a smoother finish.
Vacuum Attachments For Dust Control
Concrete sanding creates fine dust that spreads easily. Attach a vacuum to your sander to capture dust at the source. This keeps the workspace cleaner and protects your lungs. Choose a vacuum with a HEPA filter for the best results. Regularly empty the vacuum to maintain suction power during sanding.
Timing And Patience
Concrete sanding requires time and care. Rushing can cause uneven surfaces or damage. Sand in small sections to keep control over the process. Use the right grit sequence, starting coarse and moving finer. Allow breaks to check your progress and clean dust. Patience helps create a smooth, even concrete surface.
Frequently Asked Questions
What Sandpaper Is Best For Concrete?
Diamond grit sandpaper or diamond sanding pads are best for concrete. Start with coarse grit (40-60) and progress to finer grits. Use wet sanding to reduce dust and achieve a smoother finish. Regular sandpaper wears out quickly and doesn’t work well on concrete.
How Do You Smooth Out Rough Concrete?
Use diamond grit sanding pads starting with coarse grit to remove roughness. Progress to finer grits for smoothness. Keep the surface wet to reduce dust. Sand evenly and clean between grits. Finish by sealing the concrete to protect the smooth surface.
Can You Sand Concrete With Normal Sandpaper?
Normal sandpaper wears out quickly and cannot effectively sand concrete. Use diamond sanding pads for best results.
Can You Put A Skim Coat Of Concrete Over Old Concrete?
Yes, you can apply a skim coat over old concrete. Clean and repair the surface first for proper adhesion. Use a bonding agent to ensure a strong bond.
What Tools Do I Need To Sand Concrete Effectively?
You need diamond sanding pads, a concrete grinder or sander, and safety gear like masks and goggles.
Conclusion
Sanding concrete takes patience and the right tools. Start with coarse grit to remove rough spots. Then, use finer grits to smooth the surface gradually. Keep the area wet to reduce dust and improve results. Move the sander evenly across the concrete for a uniform finish.
Clean the surface between sanding steps to avoid scratches. With careful work, you can achieve a smooth, polished concrete look. Sanding makes your concrete safer and more attractive. Try these steps to improve your concrete’s appearance today.